Photographer guide
How to use Select My Shot
Upload a shoot, let your client pick their favourites with a tap, hand the picks to your editor and deliver the final photos. Here is every step, with screenshots.
Step 1
Sign in and set up your studio
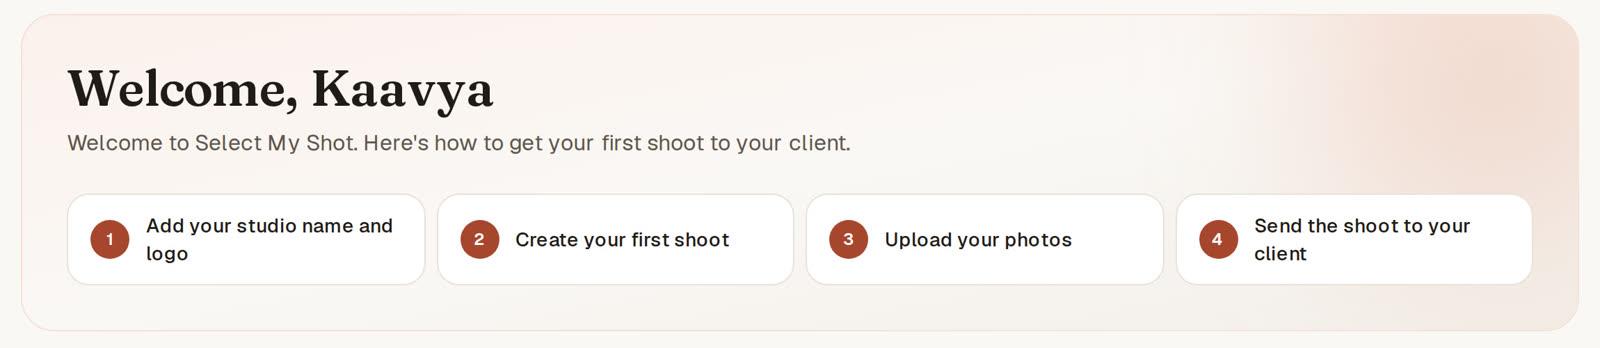
Your dashboard shows these four steps until you've done them.
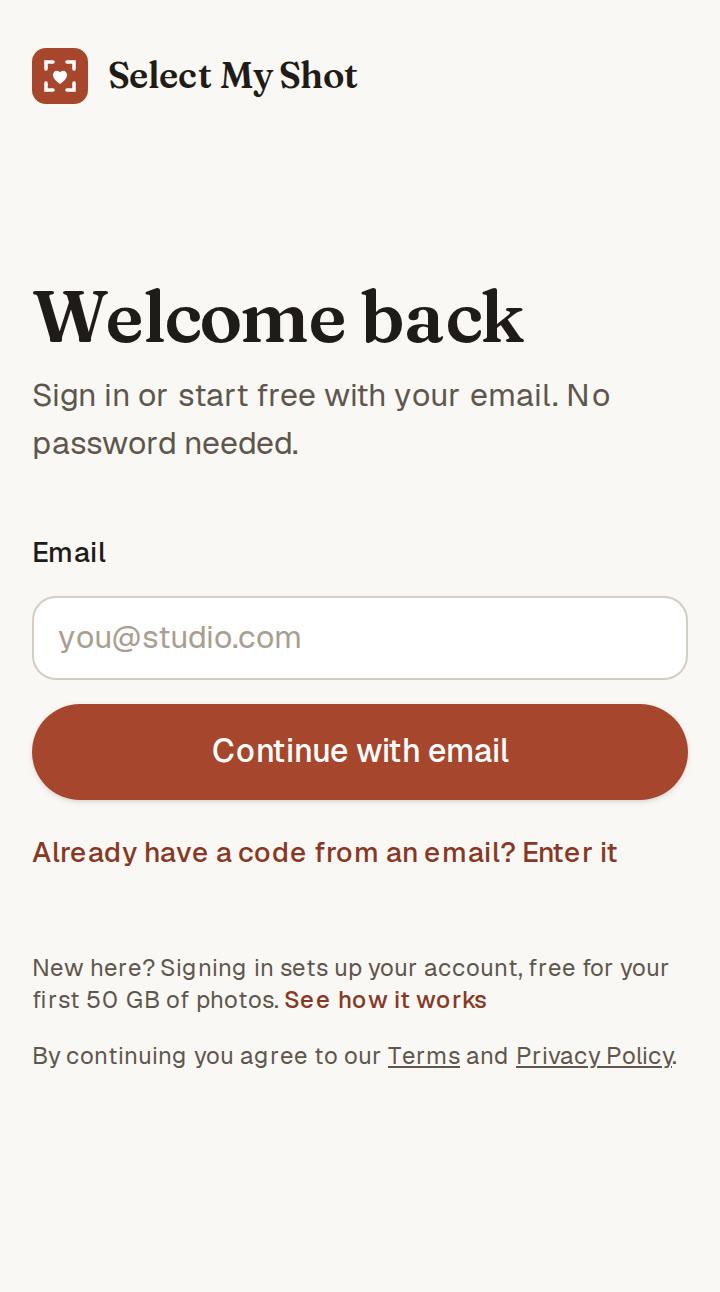
Sign in with your email. We send a link or a code. No password.
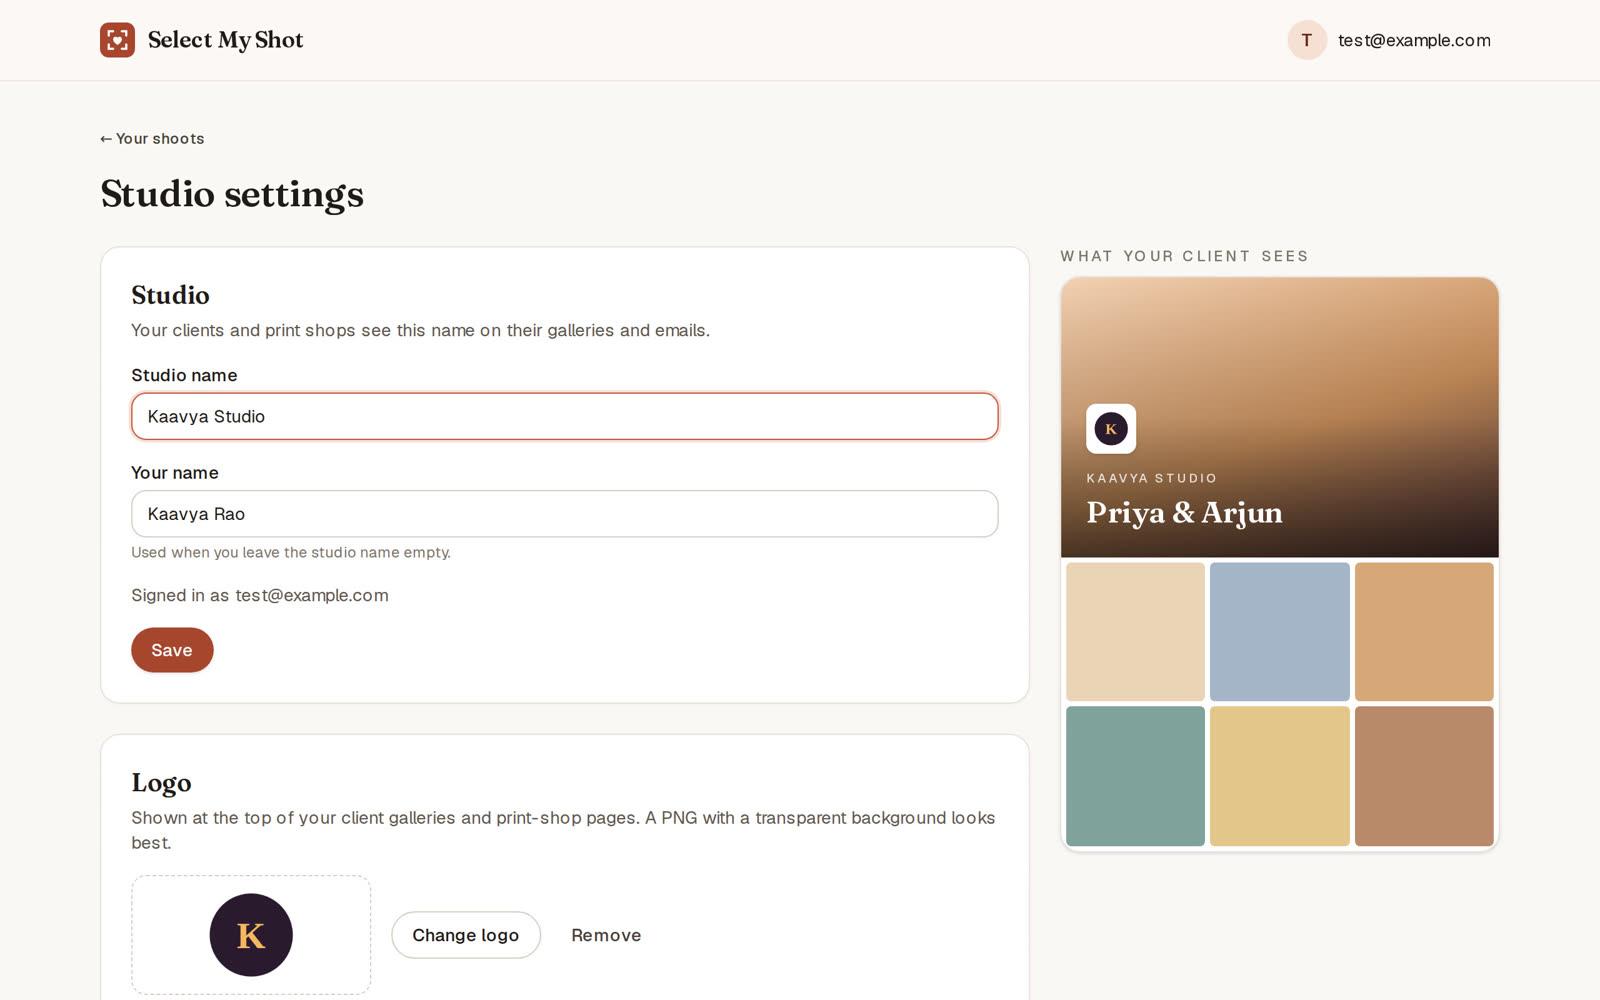
Studio settings: add your studio name and logo. Clients see them on their gallery.
- ✓New here? Signing in sets up your account, free for your first 5 GB of photos.
- ✓Open Studio settings any time from the menu at the top right.
Step 2
Create a shoot and upload
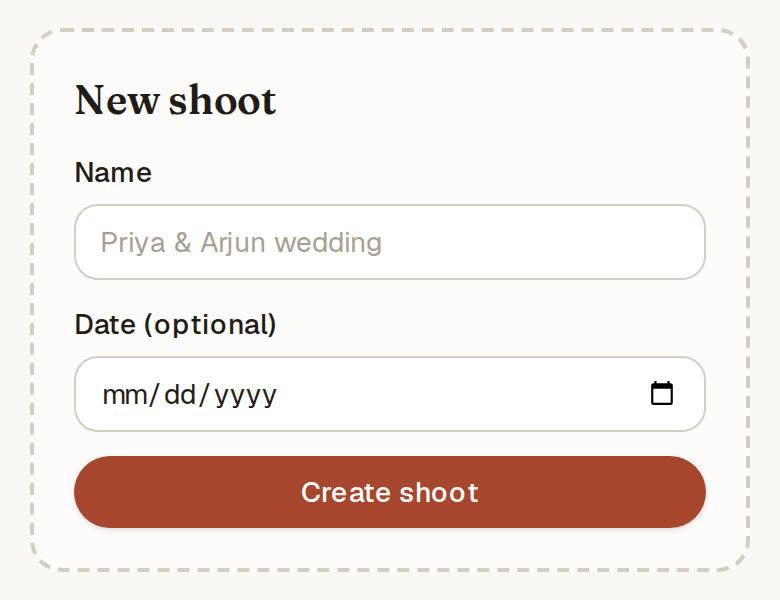
Give it a name, add the date and press Create shoot.
- 1Drag your photos onto the page, or use Choose files or Choose a folder.
- 2On an iPhone or iPad, Add from iPhone Photos picks straight from your photo library. iPhone photos arrive as JPEG; for ProRAW, save them to Files first and use Choose files.
- 3RAW files work as they are: CR3, CR2, NEF, ARW, RAF, DNG, ORF, RW2, plus JPEG.
- 4Video clips (MP4, MOV) go in the same shoot, in their own Videos section. Your client watches a light preview to pick from; the originals stay with you and your editor.
- 5Keep the page open until every photo has uploaded. Previews appear as they finish.
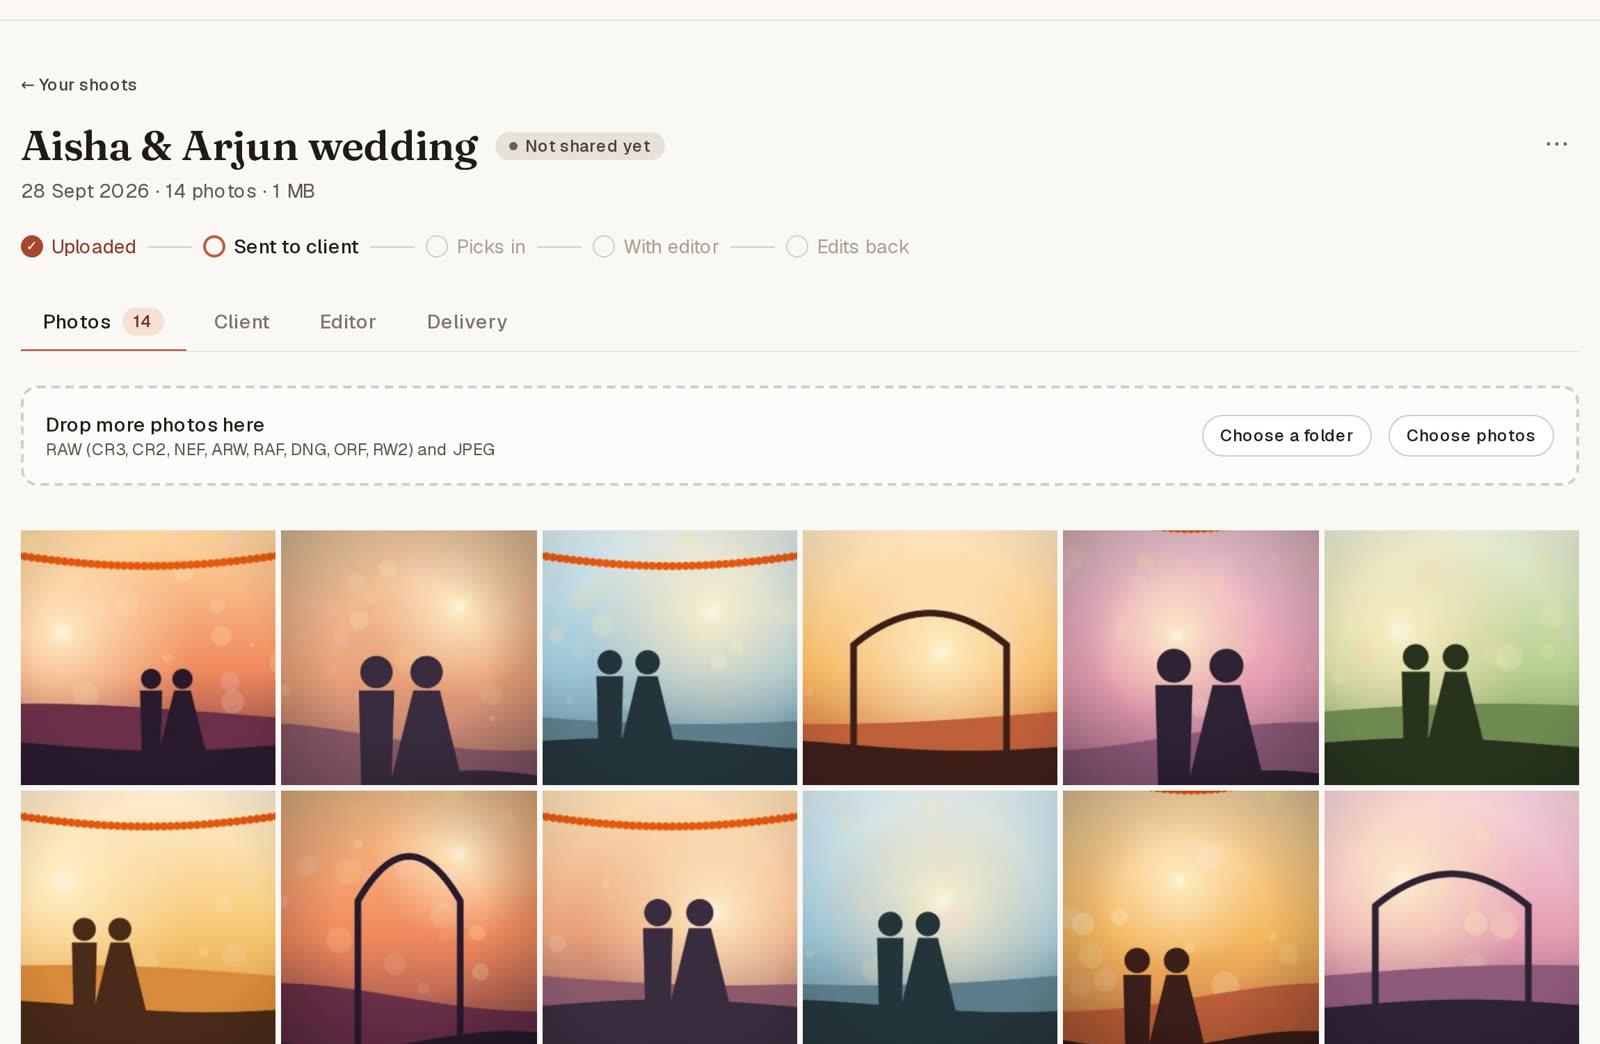
Every shoot has five tabs: Photos, Client, Editor, Albums and Delivery.
Step 3
Send the shoot to your client
Open the Client tab, fill in who it's for and press Create client link.

- 1Who is it for? The client's name, so you can tell links apart.
- 2Their email (optional). We email them the link for you.
- 3PIN (optional). 4 to 8 digits they need to open the photos.
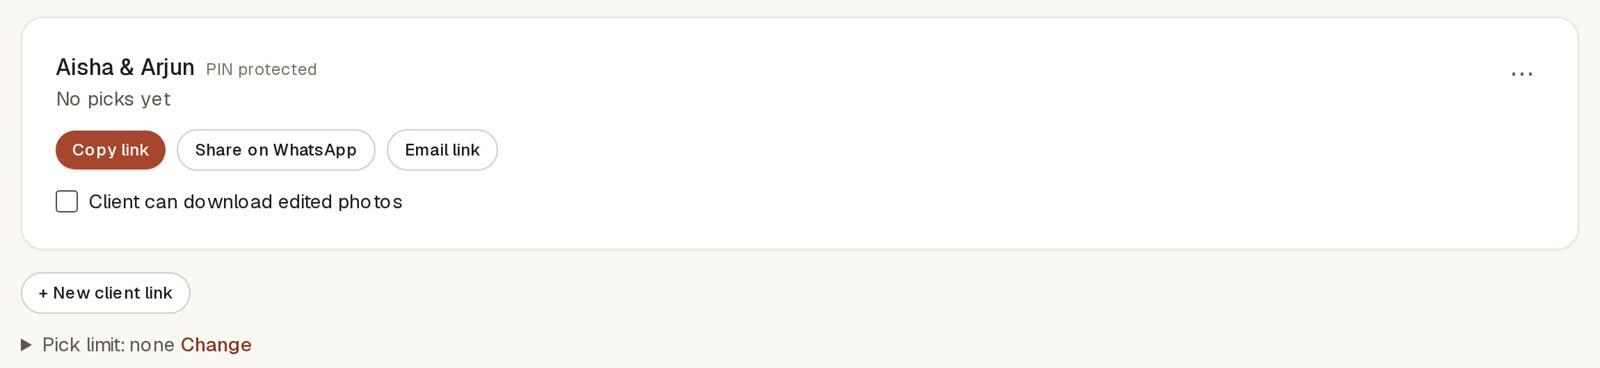
- 4Copy link, Share on WhatsApp or Email link.
- 5Client can download edited photos. Off until you tick it.
- 6⋯ menu to turn the link off. Links keep working until you do.
- 7Pick limit caps how many photos they can choose.
- ✓+ New client link makes another link, say for the parents. Each link keeps its own picks.
- ✓Clients don't need an app or an account. The link opens in any phone browser.
- ✓Pick by (optional) asks the client to send their picks by a date. If you emailed them the link, we remind them 3 days before and on the day, and tell you if the date passes. Nothing locks. Use Change or Remind on WhatsApp on the card.
- ✓Each card shows when the client last opened the link, so you know if they've looked yet.
- ✓Tick Let clients star "Must have" photos to let them mark the picks that matter most, such as for the album. It's off until you turn it on.
Your client's view
What your client sees
A gallery with your studio name and logo, made for picking on a phone.
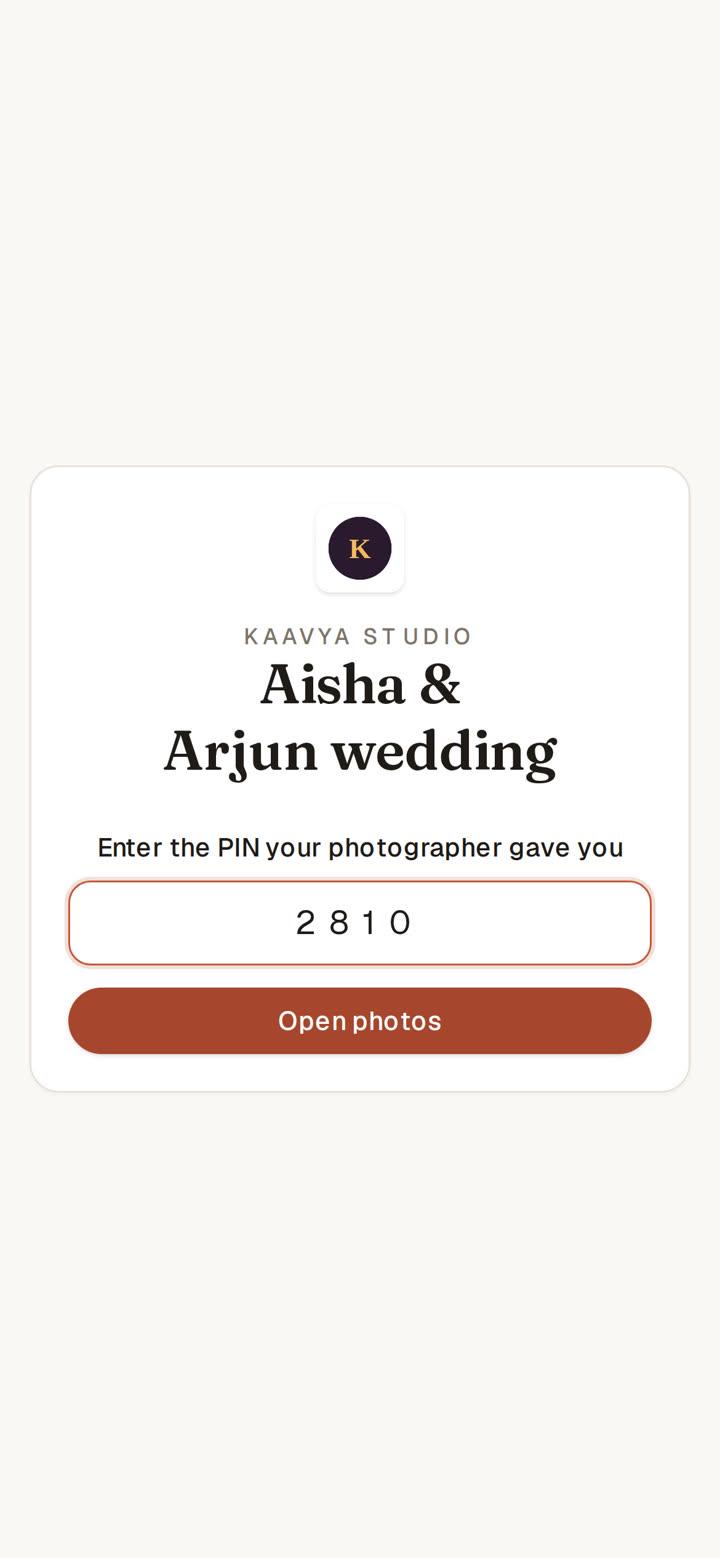
1. Enter the PIN if you set one.

2. Start picking from the cover.
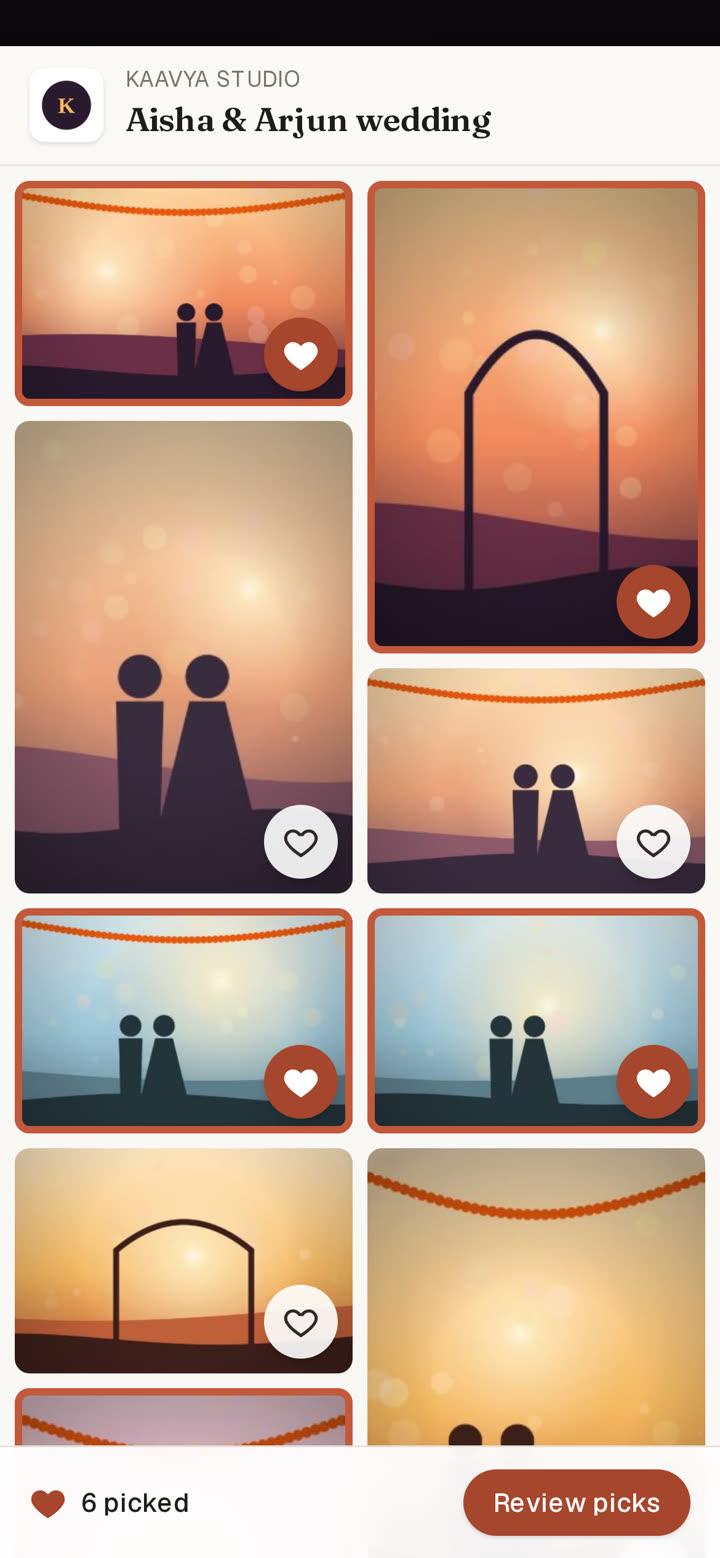
3. Tap the heart on every favourite.
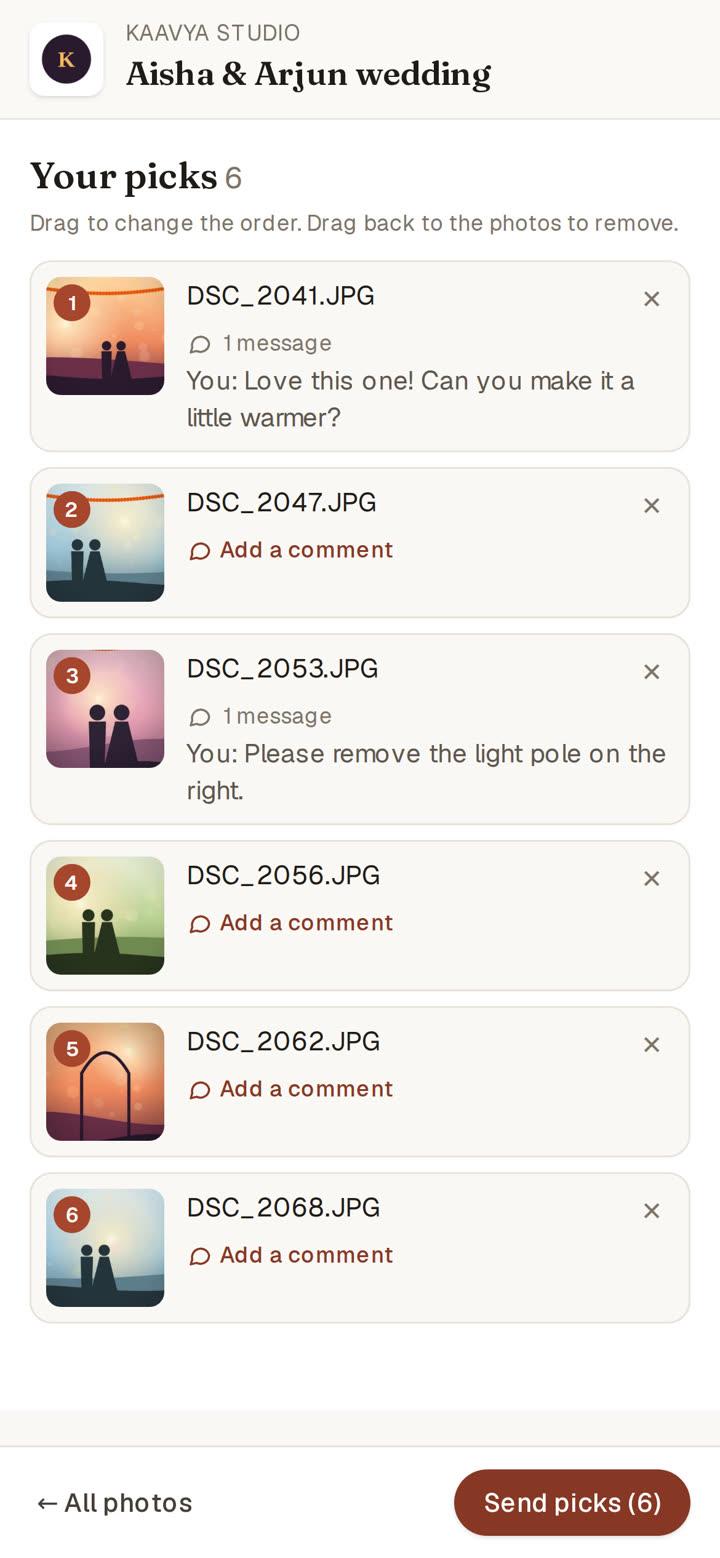
4. Review picks, reorder and add comments.

5. Send picks
When they press Send picks, you get an email and the shoot moves to Picks in.
- ✓Picks save as they go, so they can stop and come back to the same link.
- ✓If you turned on must-have stars, they tap the ☆ star on a pick to mark it Must have.
- ✓Once sent, picks are locked. You can reopen them from the Client tab.
Step 5
Hand the picks to your editor
In the Editor tab, add your editor's name (and an email or PIN if you like) and press Create editor link. Then send it like the client link.
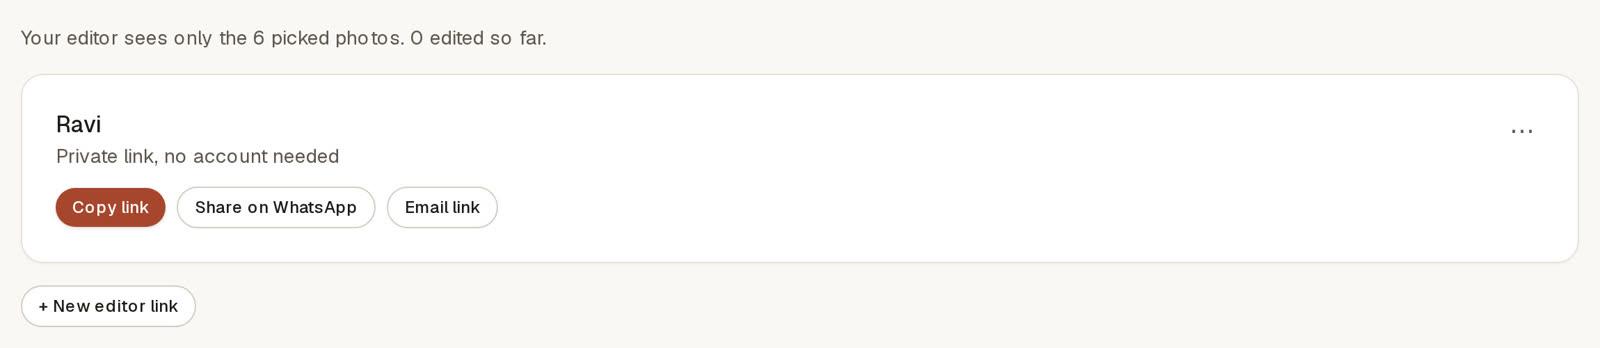
What your editor sees
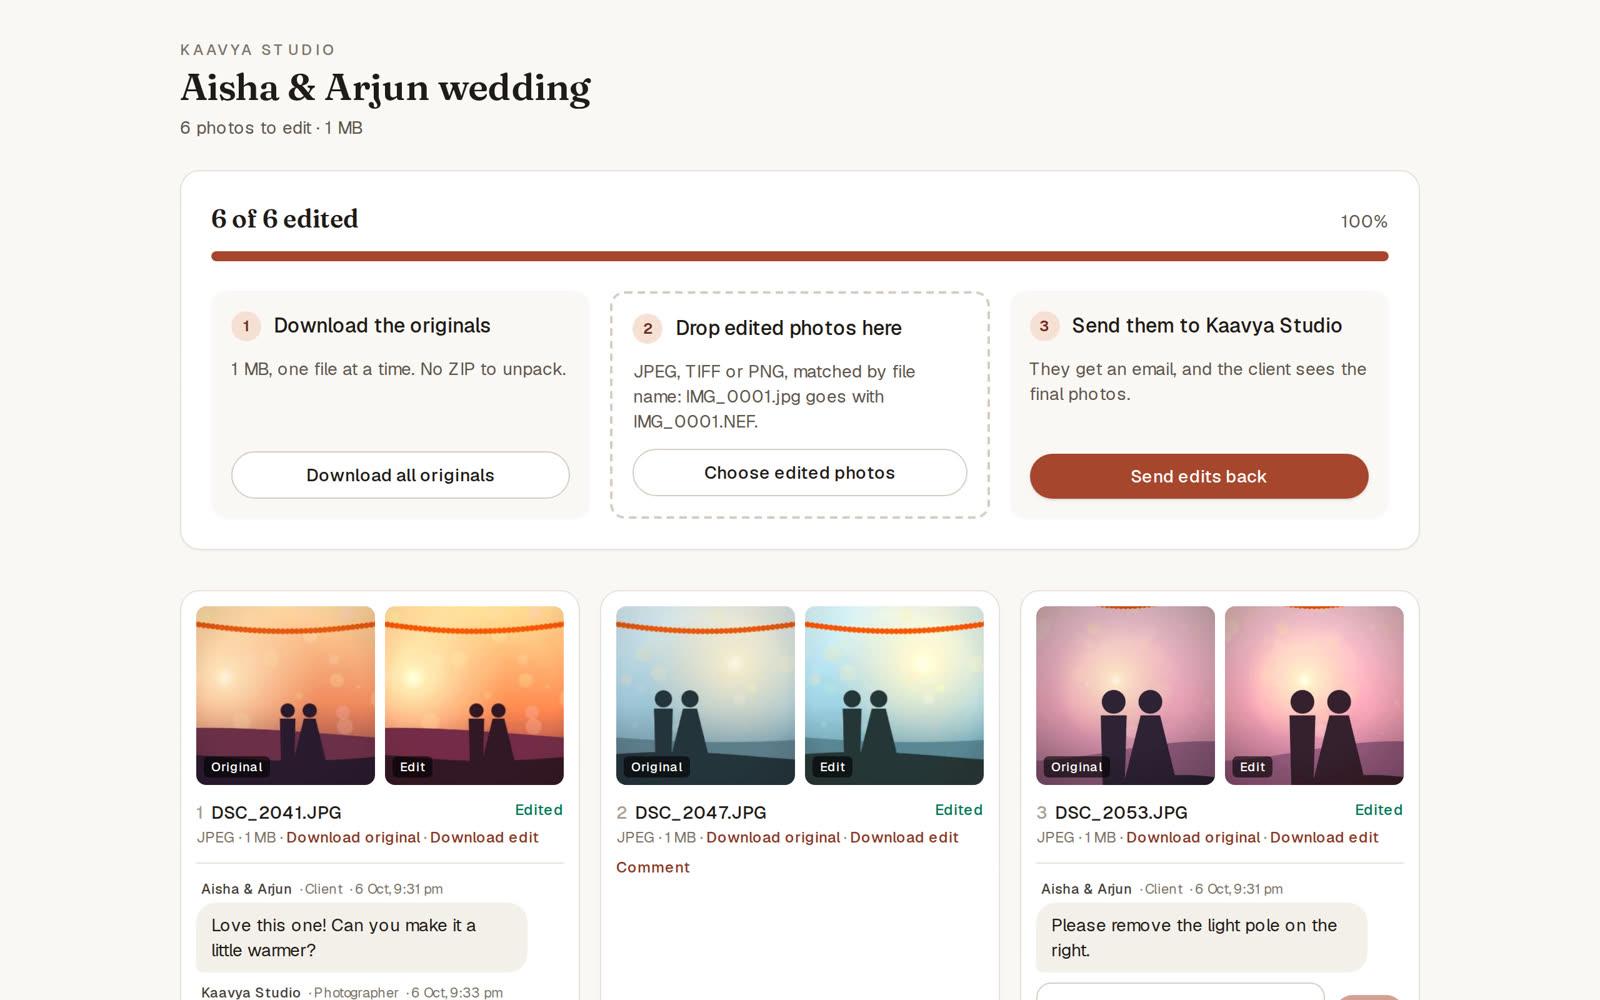
- ✓No account needed. They see only the picked photos and the client's comments.
- ✓Download all originals, one file at a time. No ZIP to unpack.
- ✓Edited photos are matched by file name: IMG_0001.jpg goes with IMG_0001.NEF. For an album or collage, they untick Match edited photos to the originals and the photos are added for the whole shoot. Ticking it again moves any of those photos whose names match back onto their originals. A wrong edit can be taken off with Remove edit on its card.
- ✓Edited videos (MP4, MOV) can be named anything. They're added for the whole shoot, so one film made from many clips is fine.
- ✓When they press Send edits back, you get an email and your client sees the finals.
Step 6
Deliver the final photos
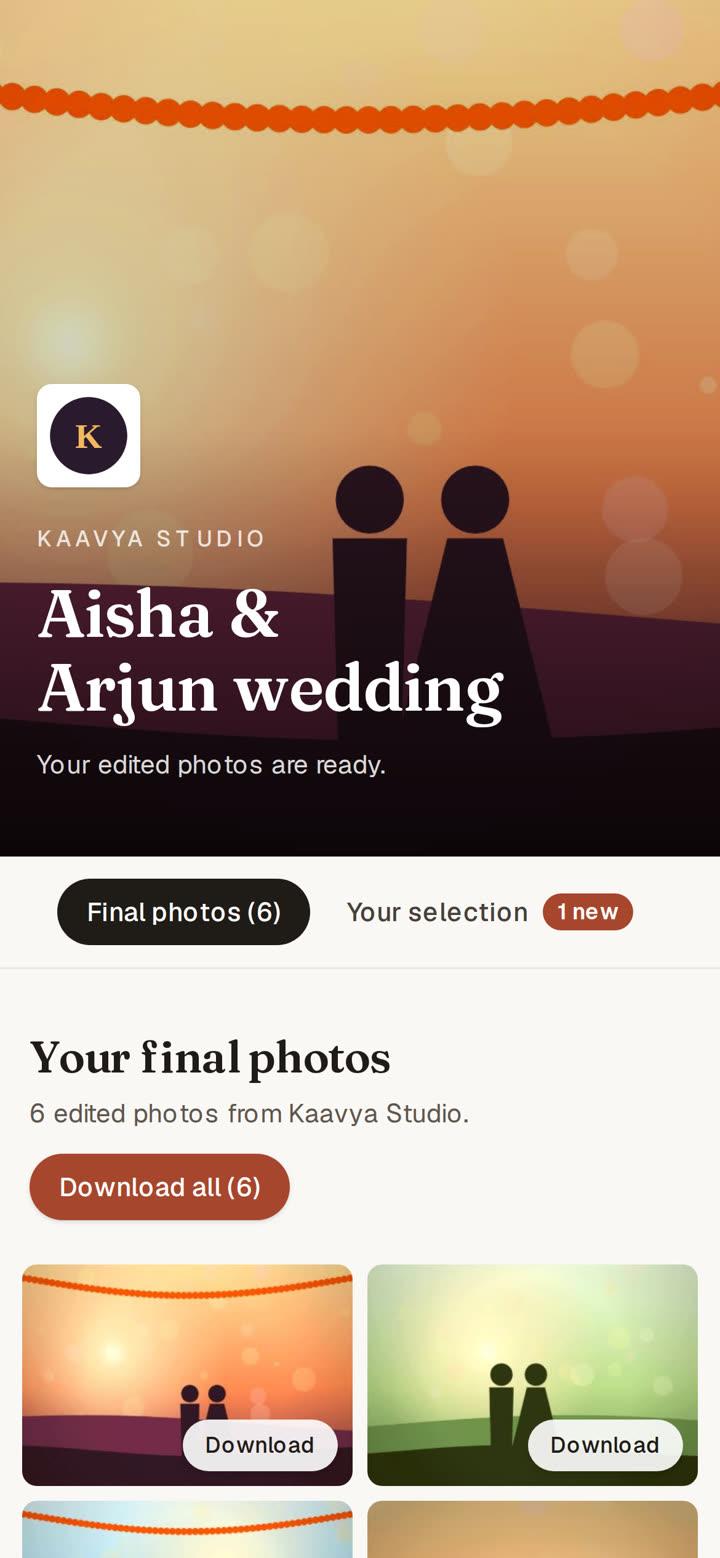
Your client's gallery opens on the final photos.
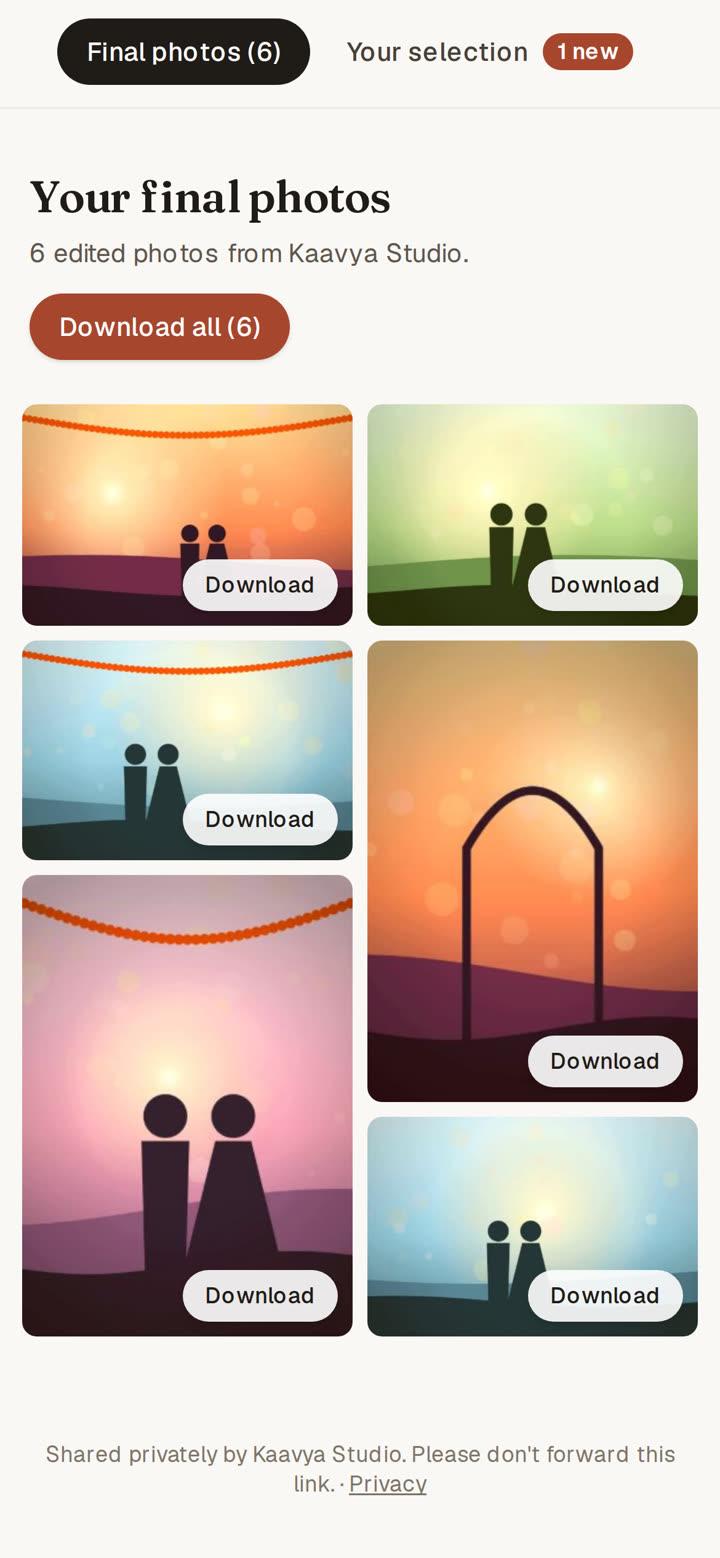
Download buttons show once you allow it.

Want them to download? Tick Client can download edited photos on the Client tab.
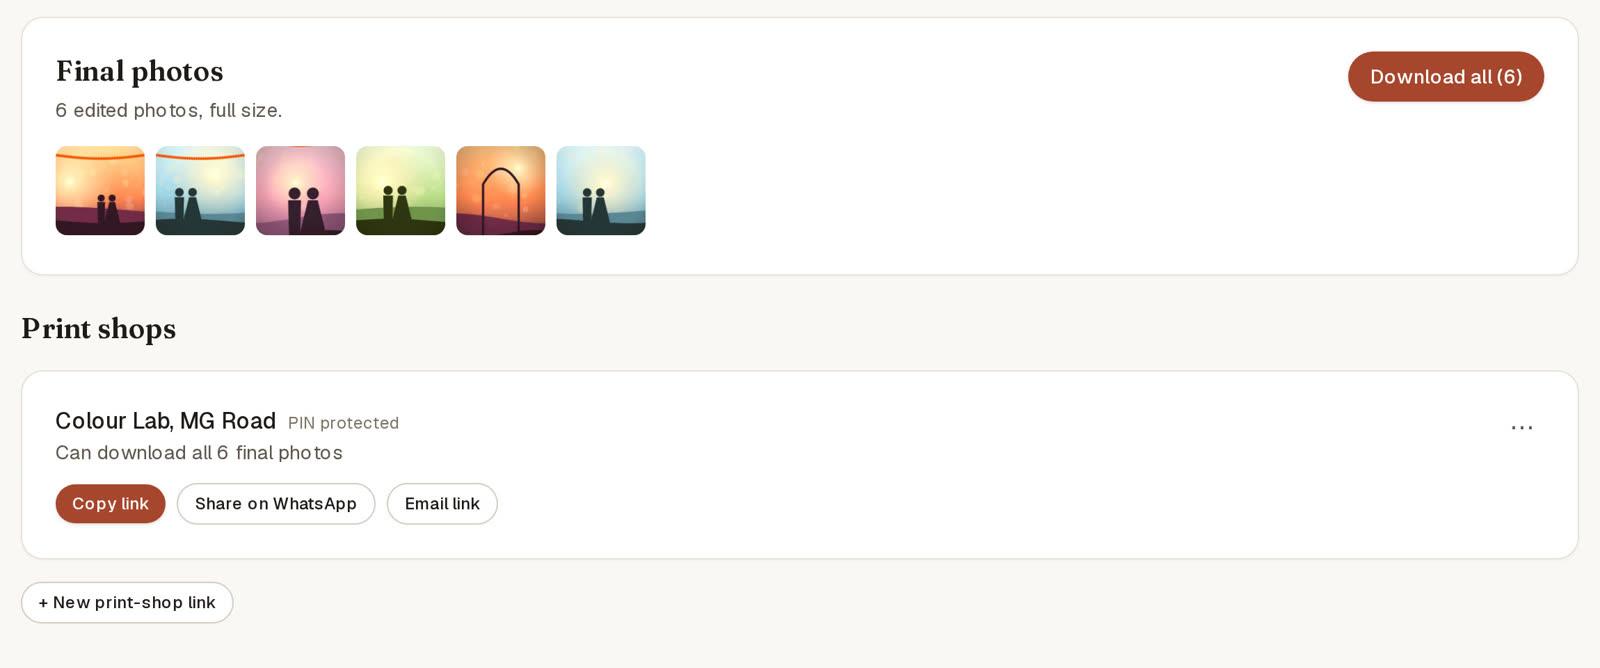
Delivery tab: download all finals yourself, or send them to a print shop.
- ✓Clients can download only the edited photos, never your originals.
- ✓Print-shop links download only the final photos, never the rest of the shoot.
- ✓Add a PIN to a print-shop link, and email or WhatsApp it from the same card.
- ✓No ZIP files. Download all saves the photos one by one.
Step 7
Let the client check the album design
Put the printed album's layout in front of your client before it goes to print. You or your album designer upload it on the shoot's Albums tab, and the client flips through it like a book on their usual link.
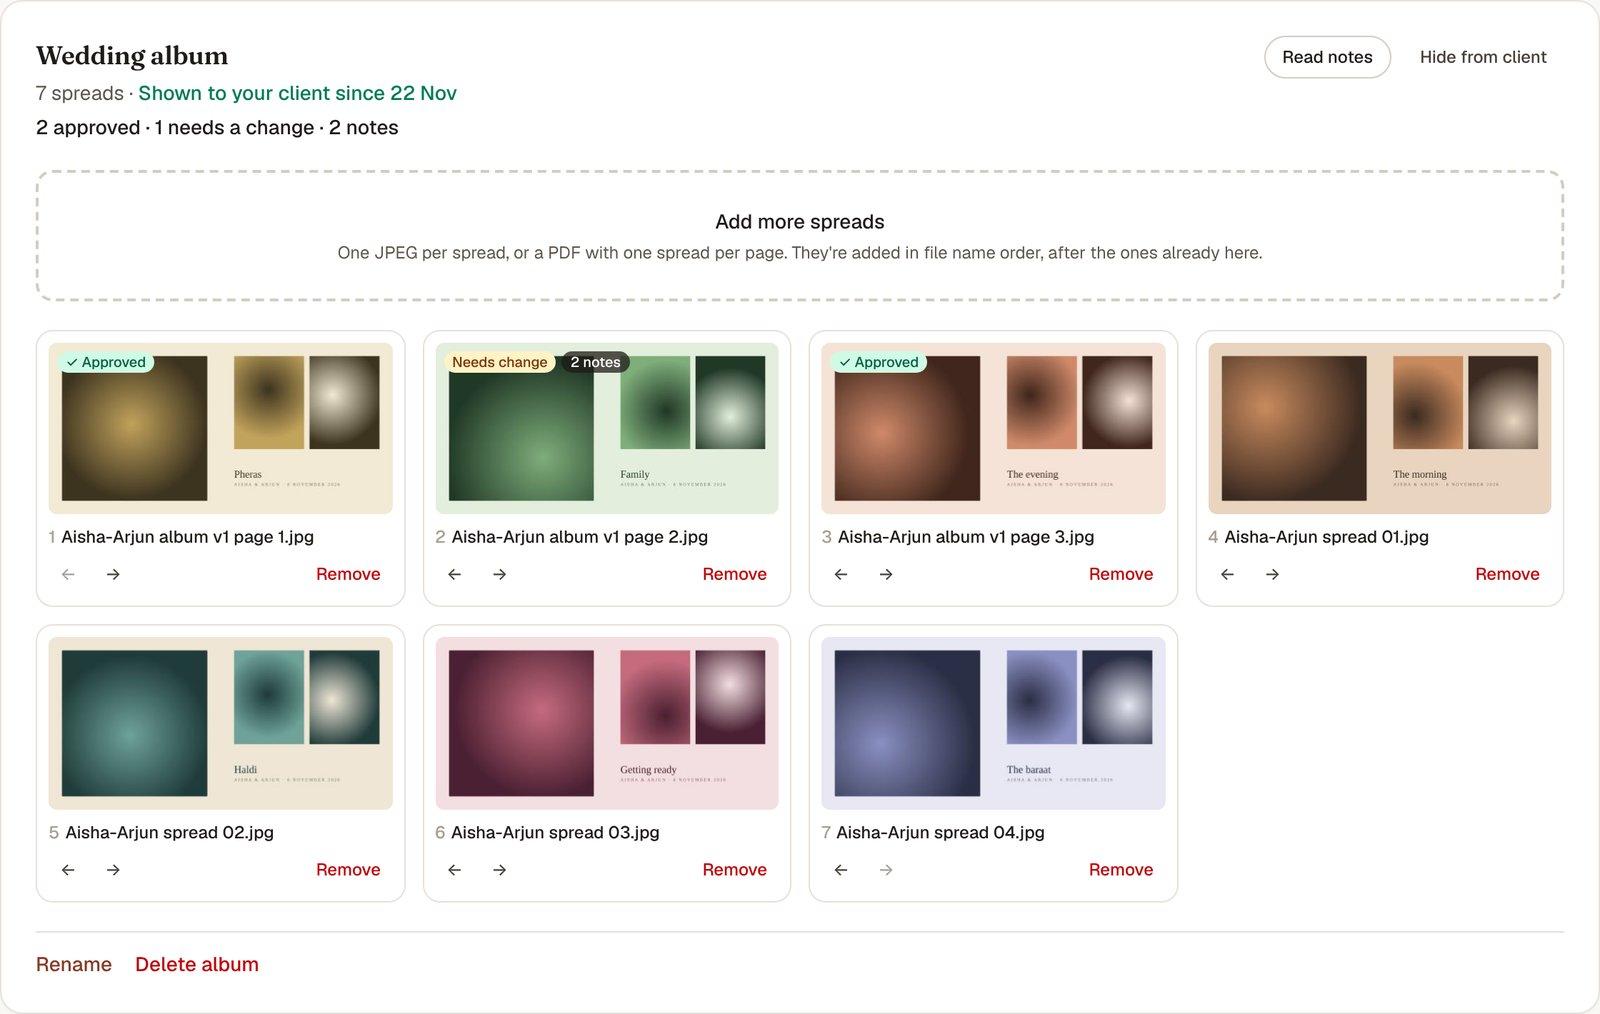
Each spread shows Approved, Needs change and how many notes. Tap one to read the notes and reply.
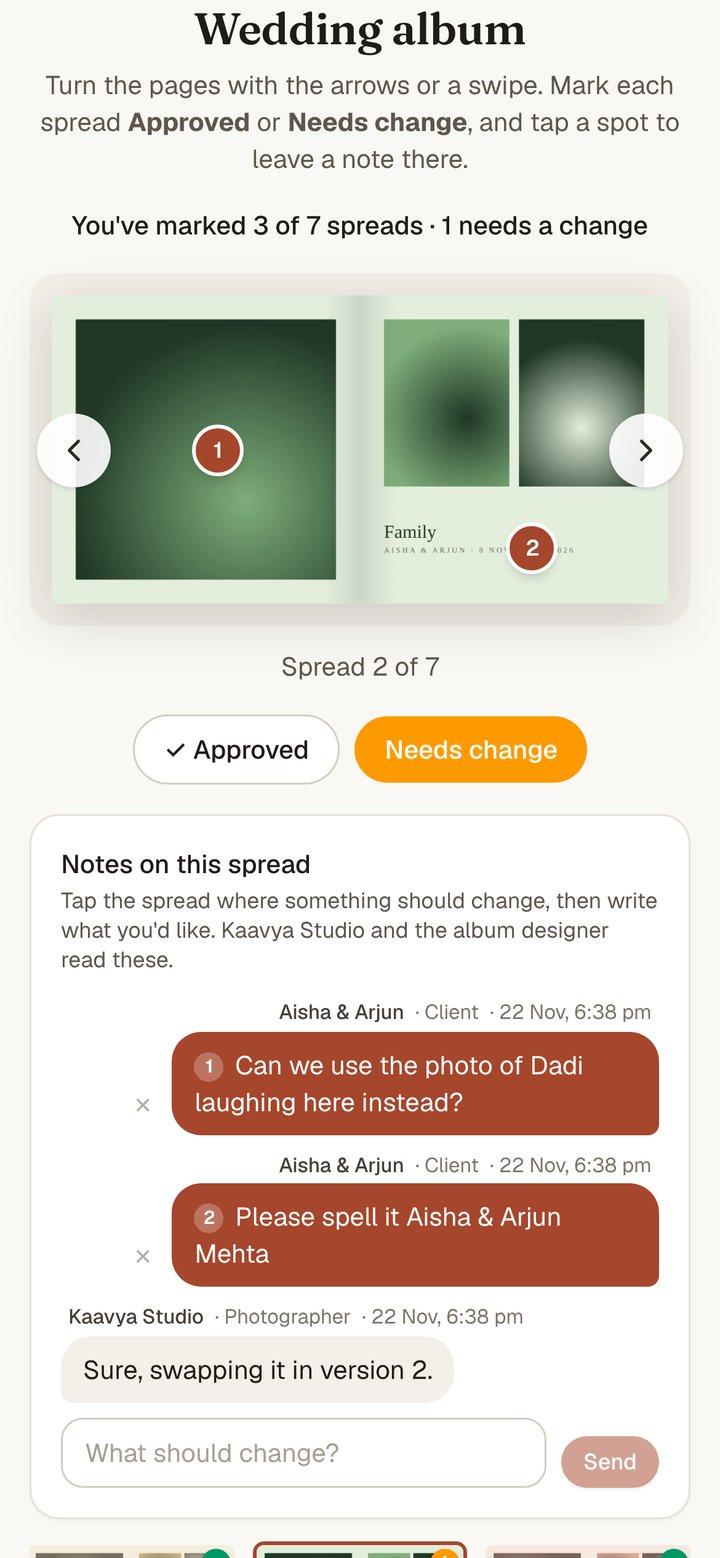
Your client taps a spot to pin a note, and marks the spread.
- ✓Upload one JPEG per spread, or a PDF with one spread per page. A PDF is split into its pages for you.
- ✓A shoot can have several albums, such as the wedding album and a parents' album.
- ✓Your editor sees the same albums on their editor page, so the designer can upload them too.
- ✓Name the album, drop in the spreads, put them in order with the arrows, then press Show to client.
- ✓Your client marks each spread Approved or Needs change, and taps the spread to pin a note to that spot. Pins are numbered to match the notes.
- ✓Read notes opens the book with every pin. Reply under each spread; you and the designer get an email when the client writes.
- ✓To make changes, press Replace under a spread or add new ones. They go into a draft of the next version; press Send version 2 to client and the changed spreads show as New, with the earlier notes beside them.
- ✓Set Rounds of changes included at the bottom of the album, and both of you see “Round 2 of 3”. It's a reminder, never a limit.
- ✓When your client presses Approve album and types their name, the album locks and you get an email. Download final spreads saves them for the printer; Unlock for changes opens it again, and every approval stays in the history.
Good to know
When a client sends you their picks
Couples and families can make their own album on Select My Shot, add the JPEGs you gave them and pick there. Then they send you one link instead of a list of file names on WhatsApp.
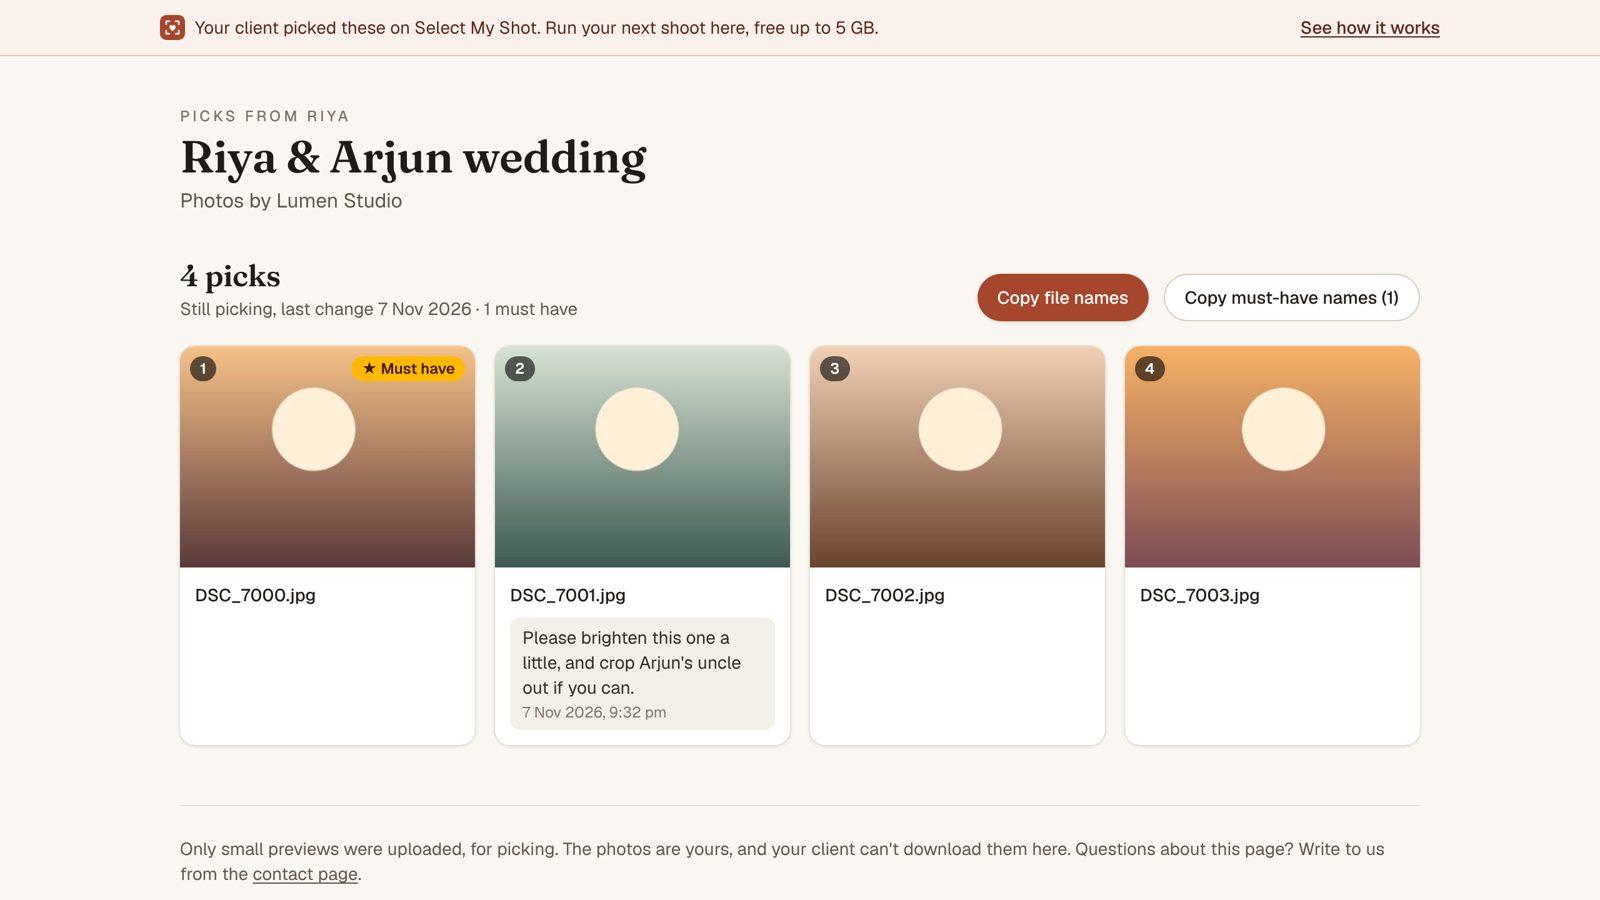
The link opens your client's picks in order, with their stars and notes. No account needed.
- ✓Copy file names puts every pick on your clipboard, ready for a Lightroom filter. Copy must-have names copies only the starred ones.
- ✓The page always shows the latest picks, and says whether your client is still picking.
- ✓Your client sees when you opened the link, so they know it reached you.
- ✓Add to my shoots makes it one of your shoots, with a free account if you're new. Then reply to notes, hand it to your editor and send the edits back, like any other shoot.
- ✓If your client chose to keep the album on their account, press Work on this album instead. You can reply to their notes, upload the edited photos and press Send edits back. Tick Client can download edited photos when they may download them. You can also lay out their printed album under Album designs on that page, for them to check and approve. Your edits and spreads count towards your storage, and the album shows under Shoots to edit on your dashboard.
- ✓Signed up earlier to pick your own photos? Choose Use as a photographer in your account menu. Your albums stay, under Your albums.
- ✓Only small previews are uploaded, for picking. Your client can't download them, and the originals stay with you.
Events
Sell photos from public events
Covered a marathon, a concert or a college fest? Put the photos up for anyone who was there to find and buy. Buyers pay you directly, by Razorpay or UPI, and Select My Shot takes no commission. Selling comes with the paid plans. Events are kept apart from your shoots and client links.
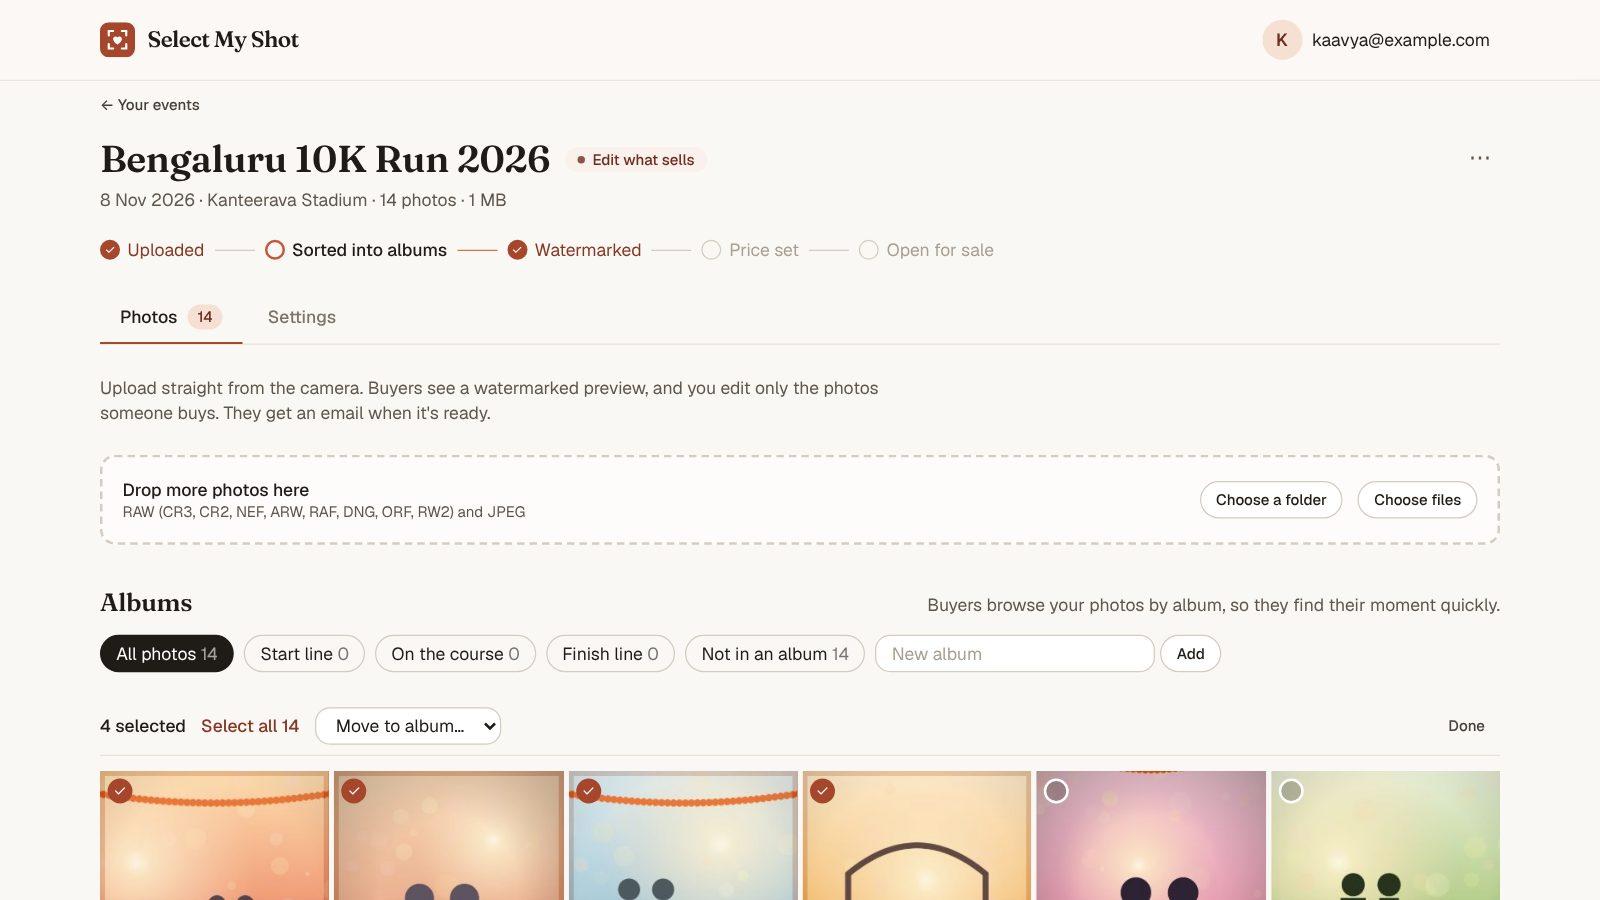
- 1Albums such as “Start line” help buyers find their moment. Type a name and press Add.
- 2Press Select photos, tap the photos and choose an album from Move to album.
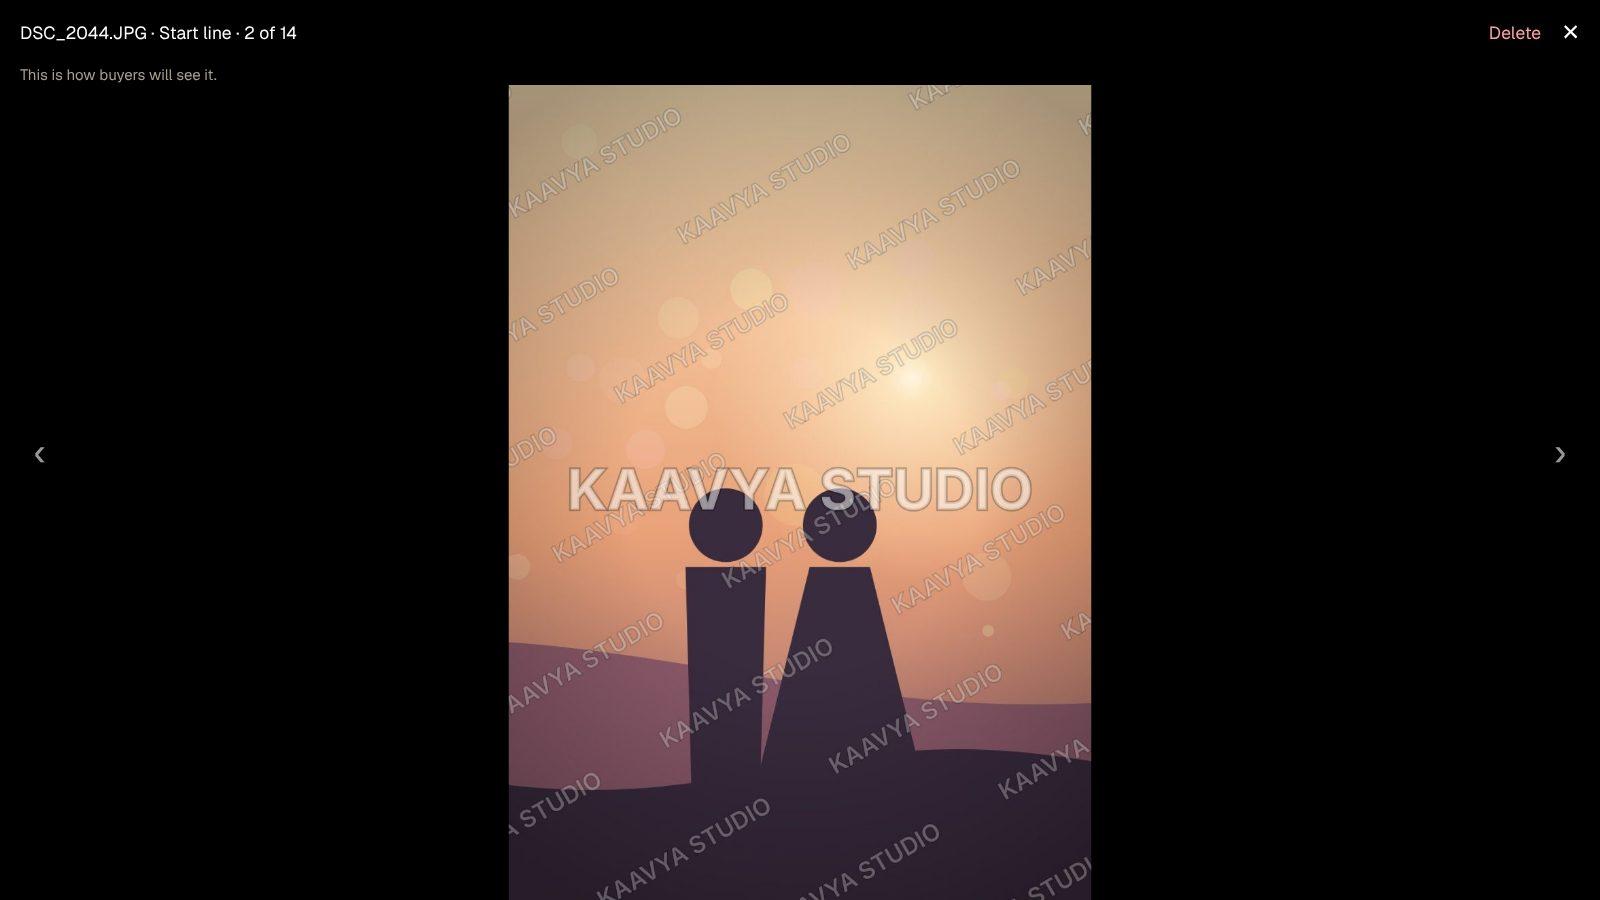
Every photo gets a smaller copy with your studio name across it. That's all buyers see before they pay.
Get paid
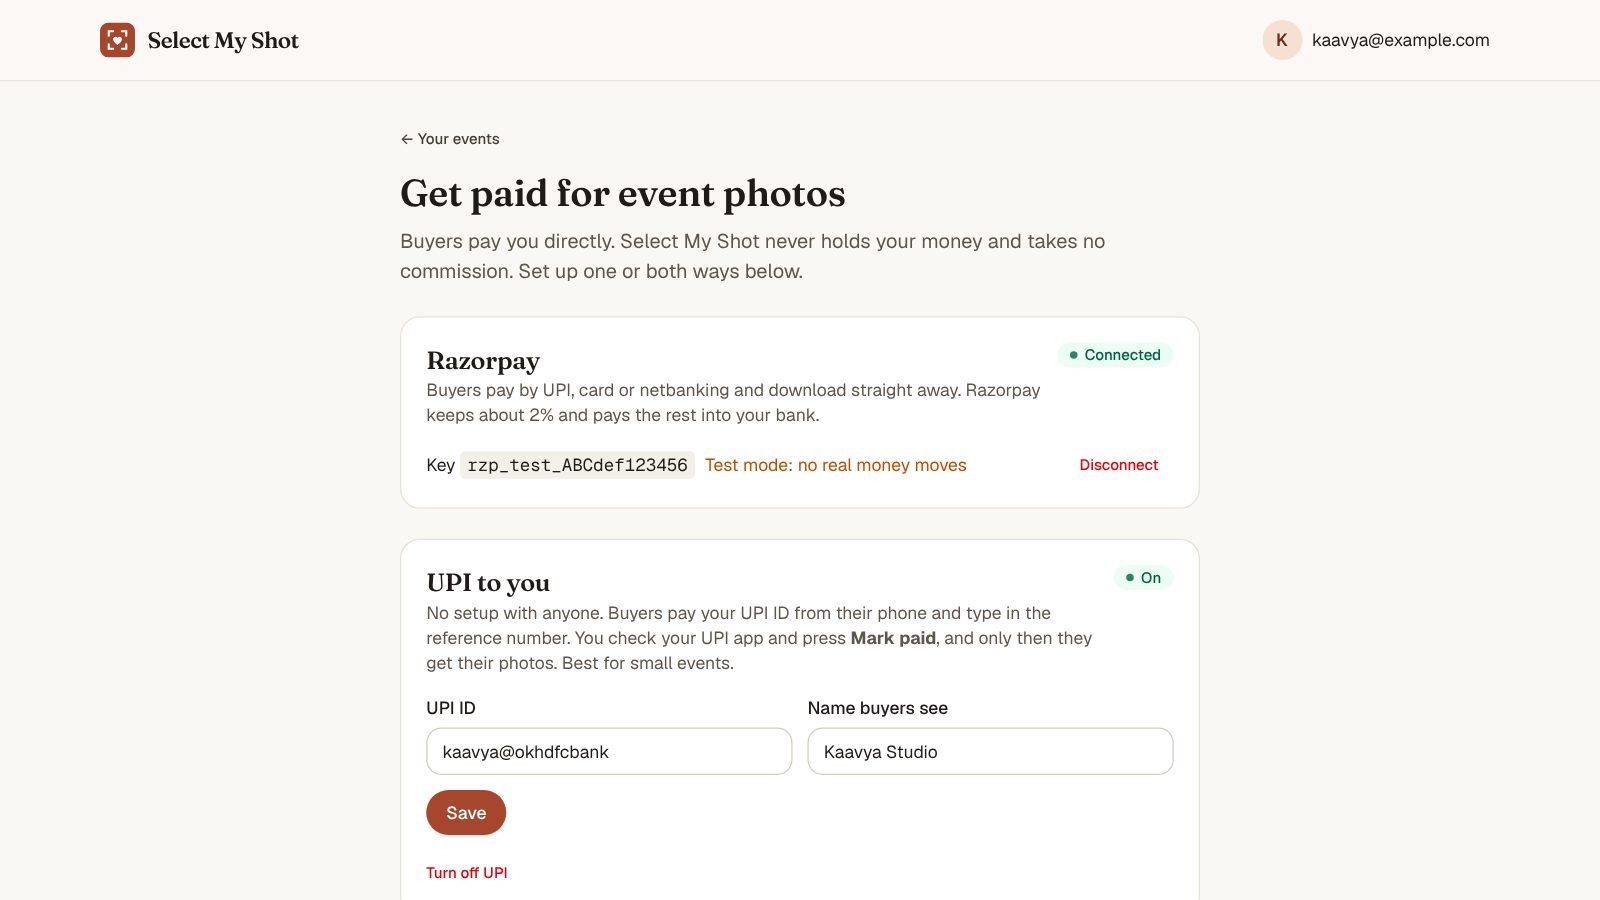
- 1Razorpay: paste the key id and key secret from your Razorpay account (Account & Settings → API keys). Buyers pay by UPI, card or netbanking and download straight away. No account yet? The page shows how to open one with your PAN, bank account and Aadhaar.
- 2UPI to you: just your UPI ID. Buyers pay from their phone and type in the reference number; you check your UPI app and press Mark paid. Best for small events.
Open for sale and share
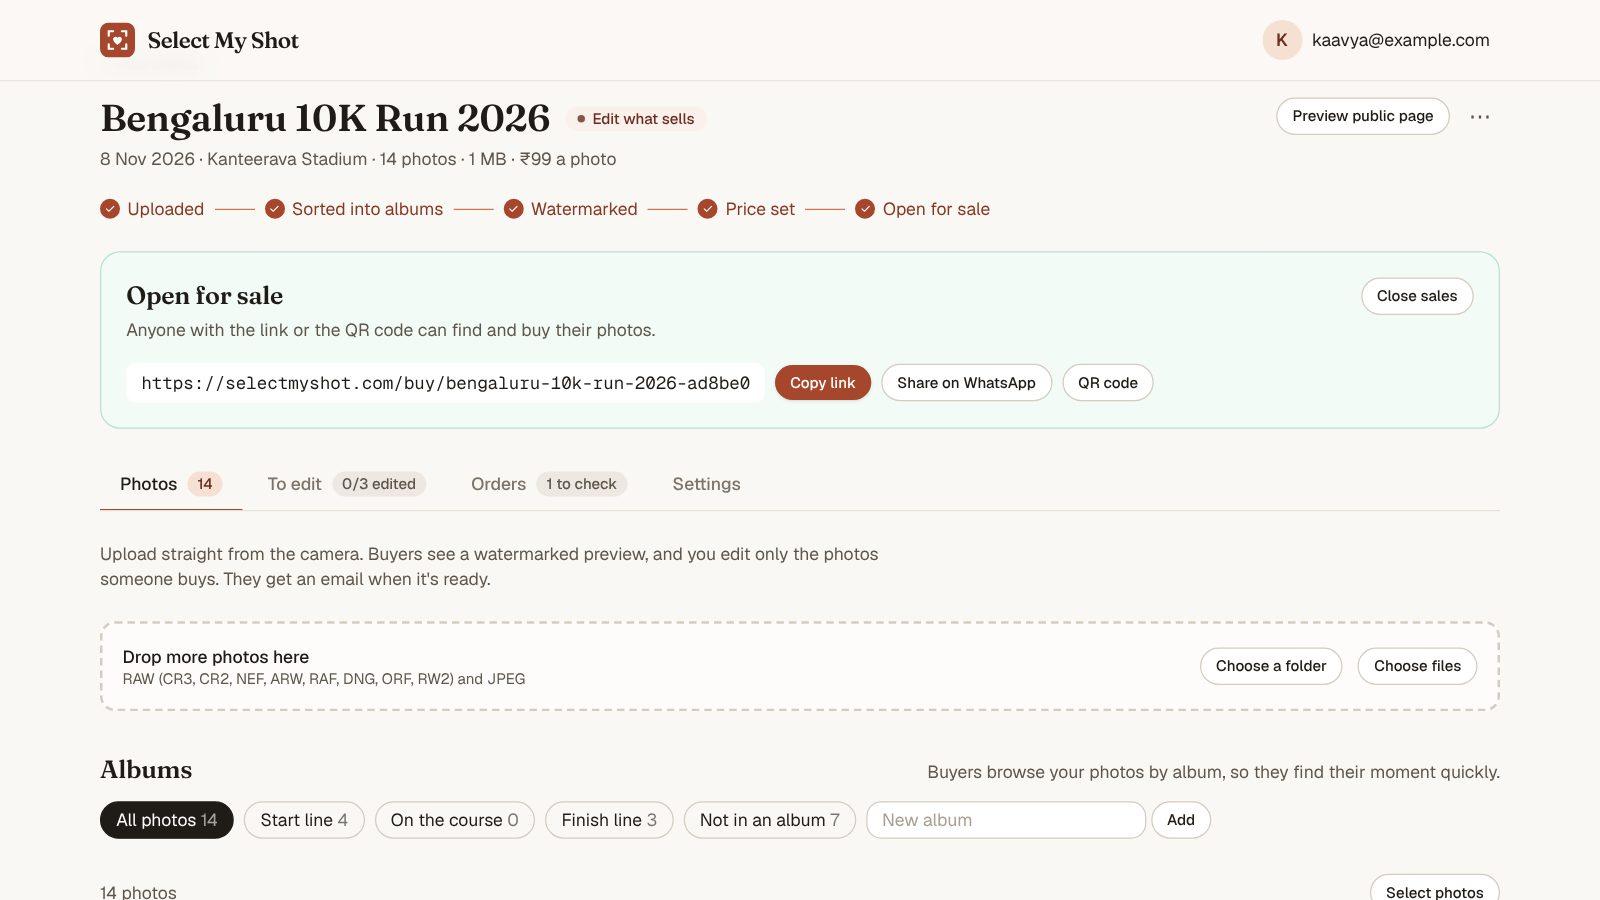
- 1Once the price is set and payments are set up, press Open for sale. Copy the link, share it on WhatsApp, or download the QR code to print for the venue.
- 2To edit lists the sold photos waiting for an edit. Orders lists every purchase.
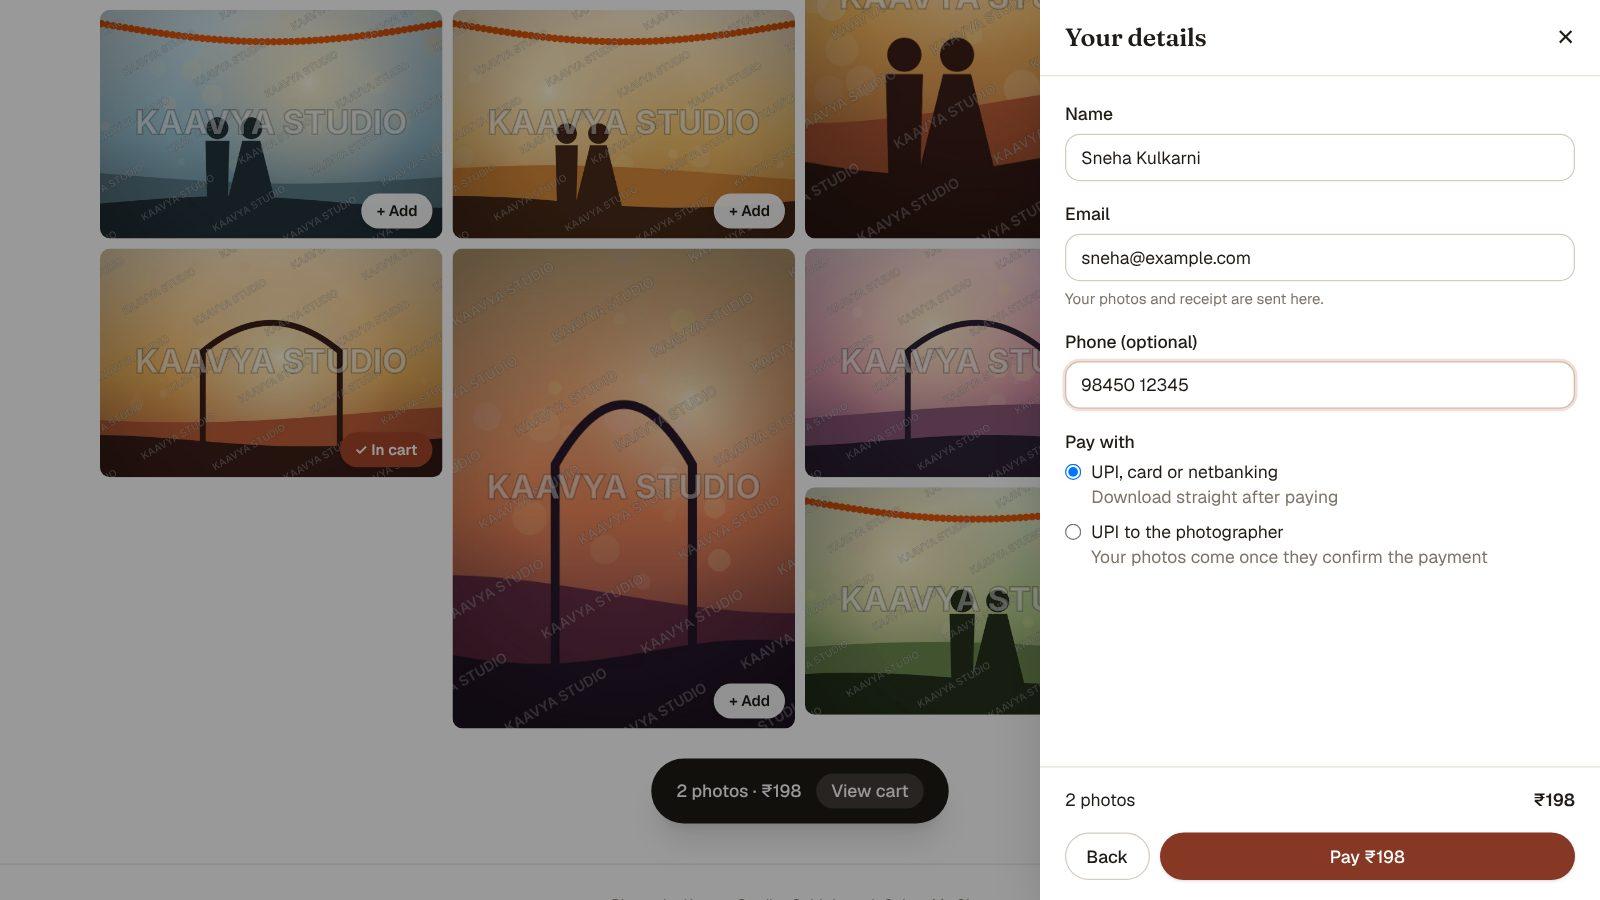
Buyers find their photos by album or time, add them to a cart and pay. No account needed. They get an email with a private download page that works for 30 days.
Edit what sells, and keep track
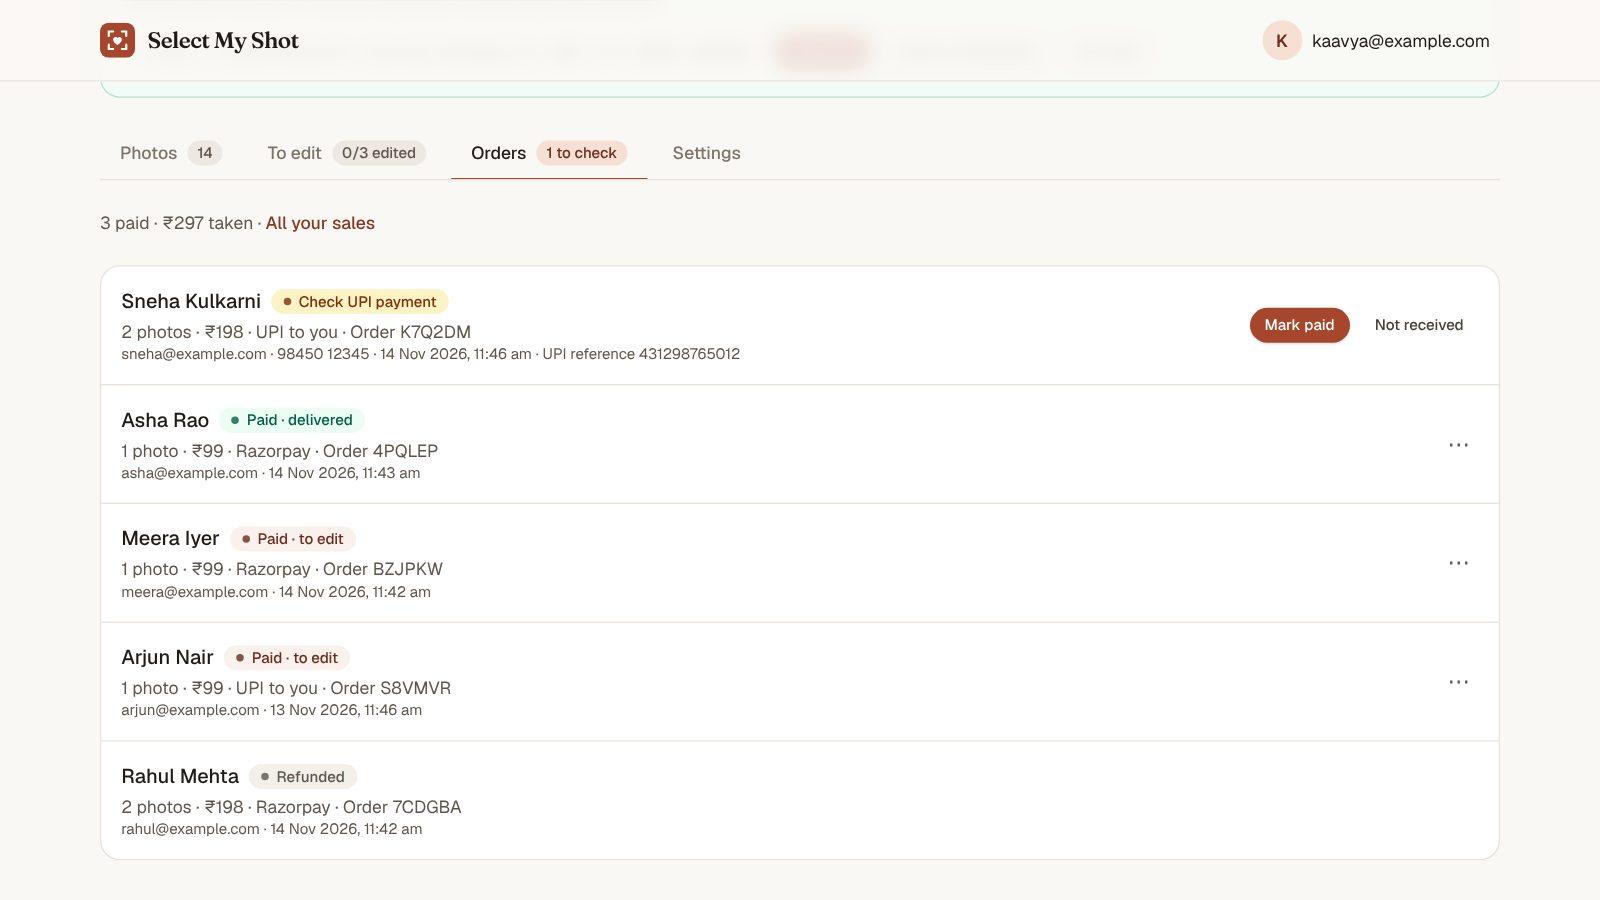
- 1A UPI order shows the buyer's reference. Find the payment in your UPI app, then press Mark paid, or Not received if it never came.
- 2The ⋯ menu sends the download link again (for another 30 days) or refunds the order. Razorpay orders are refunded through Razorpay for you.
- ✓On your dashboard, switch from Shoots to Events and fill in New event.
- ✓Edit first, then sell: upload finished JPEGs, and buyers download them as soon as they pay.
- ✓Sell from previews, edit what sells: upload straight from the camera. Bought photos appear on To edit. Edit them yourself or create an editor link, upload the edits with the same file names, and press Send to buyers. Each buyer gets a “ready” email.
- ✓Set the Price of one photo and the Days to deliver an edit on the Settings tab. No GST is added. We email you if an edit runs late, and buyers can ask for a refund after 14 days.
- ✓Sales on the Events page shows what came in for every event, with a CSV download.
Offload
Copy memory cards straight into a shoot
Select My Shot Offload is a small program for your Mac or Windows laptop. Put a card in and it copies every photo into its own dated folder, checks each file, and tells you when the card is safe to format. Connect it once, and every card it copies also turns up here as a new shoot, previews and all, ready to send to your client.
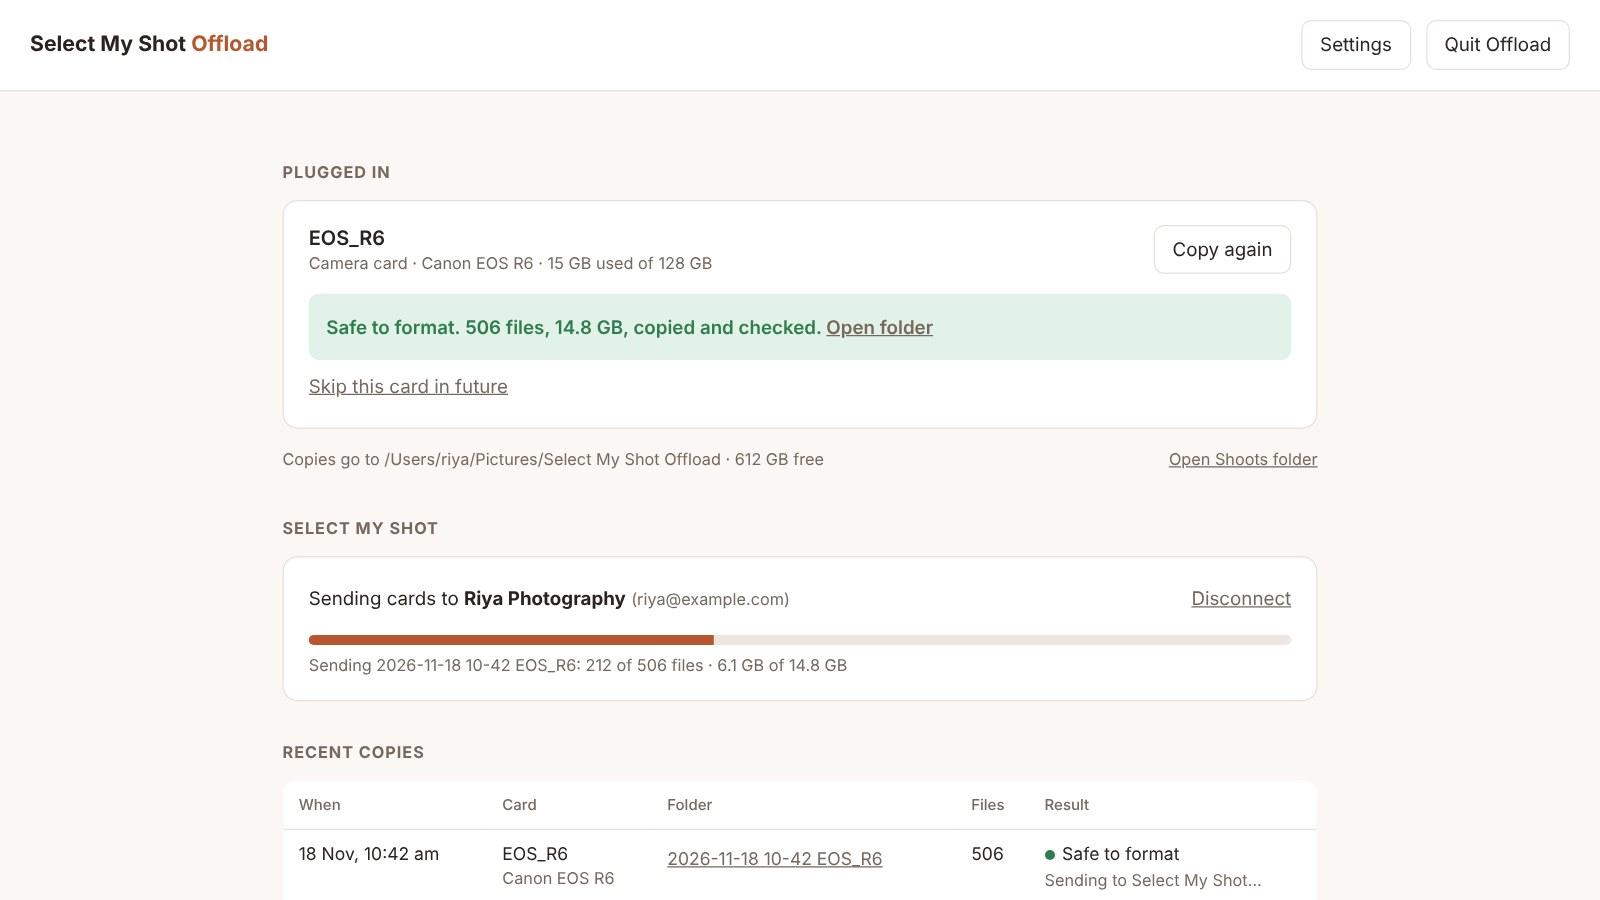
- 1Safe to format means every file was copied and read back. Until you see it, keep the card. If anything went wrong it says Don't format and lists the files.
- 2Once connected, the Select My Shot panel shows each card going up, three photos at a time, with their previews.
- 3Each copy in Recent copies links to its shoot. Cards copied before you connected have a Send to Select My Shot link instead.
Connect Offload to your account
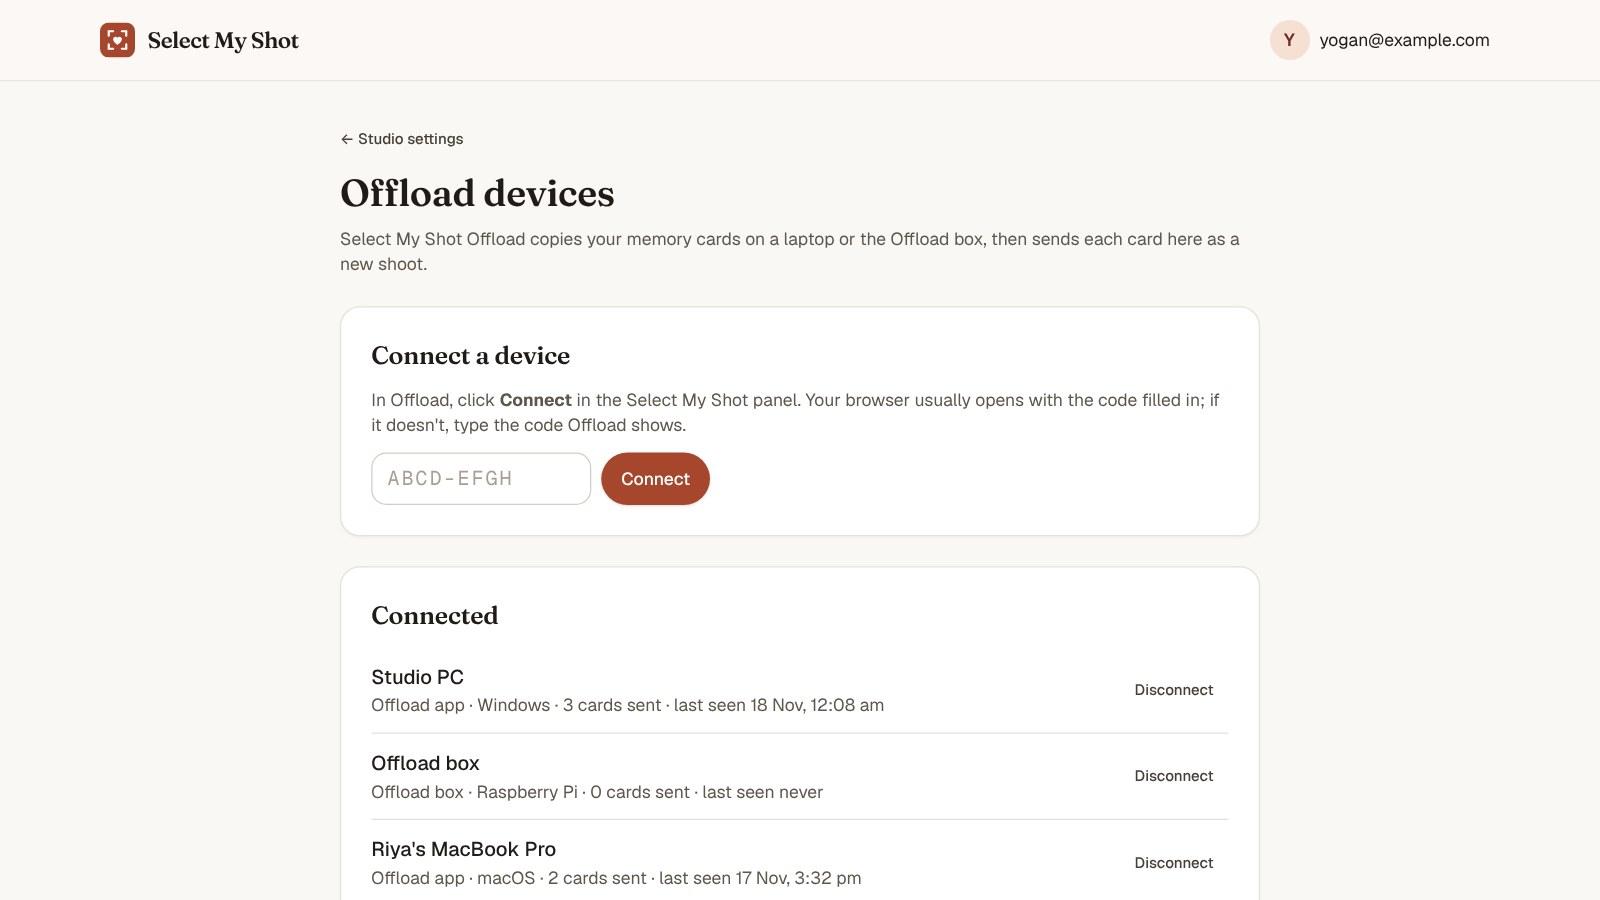
- 1In Offload, click Connect. Your browser opens this page with the code filled in; press Connect. If it doesn't open, go to Studio settings → Manage devices and type the code.
- 2Disconnect stops a lost or old laptop sending photos straight away. Shoots it already sent stay as they are.
The Offload box
For weddings and events there is also a small box (a Raspberry Pi with an SSD) that does the same without a laptop. Put a card in, walk away, and its lights tell you when it's done. Your phone shows the details.
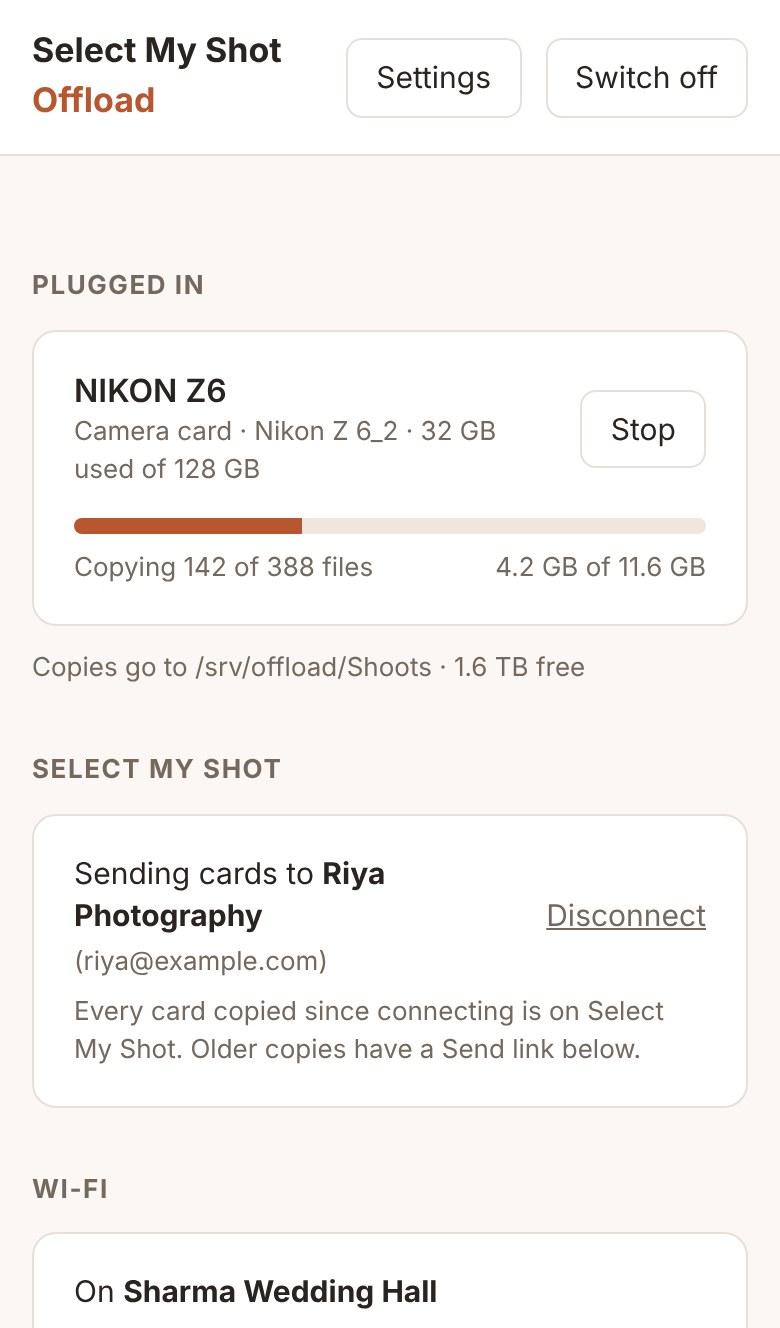
Open http://offload.local on a phone on the same Wi-Fi and type the box's PIN.
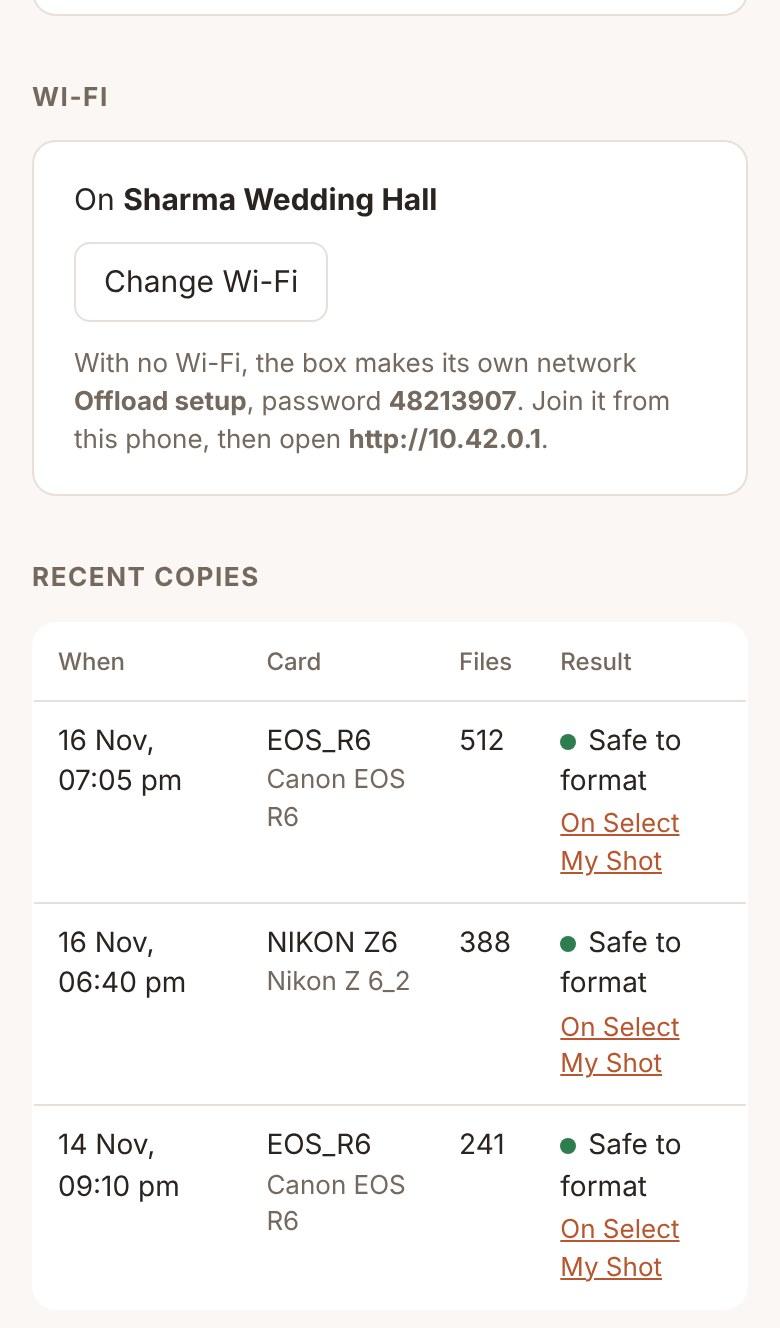
Change Wi-Fi moves the box to the venue's Wi-Fi or your phone's hotspot.
- ✓Lights: amber blinking means copying, steady green means safe to format, steady red means don't format (the phone page says why).
- ✓At a new venue the box makes its own network, Offload setup, after about a minute and a half. Join it from your phone, open http://10.42.0.1 and choose a Wi-Fi. Its password is written on the box with the PIN.
- ✓The card is only ever read, never changed or formatted. Formatting stays your call, in the camera.
- ✓Only cards and plugged-in drives show. Other partitions and disks inside your computer are left out. To hide a drive you never copy, such as a USB backup disk, press Hide this drive. Hidden drives are listed in Offload's Settings, each with Show again.
- ✓Get Offload from Studio settings → Manage devices, for Mac, Windows or the box. When a newer version is out, Offload says so with a link there. On Windows the new file has the version in its name: open it once, then delete the old one. To ask about a box, write to [email protected].
Good to know
Quick answers
Do clients need an account?
No. They only need the link, and the PIN if you set one.
Does my editor need an account?
No. An editor link is enough. If they already use Select My Shot, use “Invite by email instead” on the Editor tab.
Can clients download the originals?
No. They can download only the edited photos, and only after you tick “Client can download edited photos”.
Do links expire?
No. A link works until you turn it off from its ⋯ menu.
My client wants to change their picks.
Open the Client tab, expand their picks and press “Let the client change picks”.
Can I add more photos later?
Yes. Drop them on the Photos tab of the same shoot.
Can photos go up straight from my memory card?
Yes, with Select My Shot Offload on your laptop or the Offload box. Each card is copied, checked and sent as its own shoot. See Offload above.
Can I share videos too?
Yes. Upload MP4 or MOV clips with the photos. A Photos / Videos switch above the grid keeps them one tap away. Clients play a light preview and pick clips with the heart, your editor gets the original clips they picked. The edited film comes back for every client of the shoot to watch, with downloads only if you allow them. Clients can leave notes pinned to a moment in it (“0:42 trim this”) and press Approve; you and your editor read and reply under Read notes on its card. Print-shop links leave videos out.
What if I need more than 5 GB?
Open Plan and storage from your account menu and choose a bigger plan: 100 GB for ₹199, 250 GB for ₹499, 500 GB for ₹999 a month. Yearly billing costs ten months. You pay by card or UPI through Razorpay, and can cancel there any time.
Try it on your next shoot
Free for your first 5 GB. Questions? Write to [email protected].
Step 4
Read their picks and comments
Clients write feedback right on the photo. You and your editor both see it, so nothing gets lost in screenshots.
The client comments on a photo, for the editor and for you.